He tends his flock like a shepherd: He gathers the lambs in his arms and carries them close to his heart;
he gently leads those that have young
. {Isaiah 40:11}

Showing posts sorted by date for query yogurt. Sort by relevance Show all posts

22 July 2013

Our Granola Recipe


Maybe this should be titled "THE Granola Recipe".
Yup. It's that good.
I'm sharing this because I've been asked for it a few times since Baby Sister's wedding.
That's because we made enough of it for 150 people as favors for the wedding so the goodness was shared with some of our favorite people.
The great thing about granola is that it can be played with and you'll still get great results so I'll share my most used recipe with the encouragement that you play around using things you like...

"THE Granola Recipe"
(start to finish: 30 minutes or so :  yield: about 12 cups, 3 - qt mason jars)

6 cups of rolled oats (not quick oats)
2 c sliced almonds, raw
1.5 c sunflower seeds, shelled and raw
2/3 c coconut oil
1 c pure maple syrup
2 c raisins (optional)

Set the oven to 325.
In a large mixing bowl, mix oats, coconut, almonds, and seeds. Set aside. 
In a medium saucepan over medium/low heat,  melt coconut oil and maple syrup until they are well mixed. This will not take long since coconut oil's melting point is so low, maybe 2-3 minutes. 
Pour melted oil and syrup over dry ingredients and stir until all is well coated. 
Pour enough of the mixture onto a baking sheet so that you have a thin layer of granola and are able to stir it around without spilling everywhere. 
Place into oven and bake for 5 minutes at a time, stirring after every 5, until the granola is a nice golden brown. Between 15-20 minutes per batch. (The mixture will not likely feel crunchy while still hot. The crunch comes as it cools so look for color, not crunch.)
Let cool for a few minutes. 
Once cool, either pour into a large bowl to break up any chunks and to stir in raisins, or place directly into storage container(s). (We use three quart sized mason jars.)

The kids love their granola like they do cereal, in a bowl with milk. I prefer it over some homemade yogurt and Hubs inevitably ends up taking it to work with him with milk and blueberries. It's also great over ice cream.
No matter how you like it, you've really got to try this deliciousness!

* Depending on how you feel about certain foods, you can substitute some of the ingredients and get similar flavor results. For example, you can use vegetable oil or canola oil instead of coconut oil (though I would not recommend it). You can also substitute honey for maple syrup or a mixture of the two.


16 August 2012

Prep Ahead Chicken for Dinner

I recently read a blog post by Natalie over at A Turtle's Life For Me and was inspired by her freezer meal prep.
I've heard of freezer meals and Once a Month Cooking but those are often casseroles, lasagnas, and stews and those aren't on the menu often around our house.
Instead, Natalie shreds chicken, prepares sauces, and marinates the meat ahead of time. For me... this is brilliance!
So I took my first stab at it yesterday and after purchasing chicken from Costco (they have organic whole chickens, chicken breasts, and thighs now!)
I didn't follow Natalie's full approach because if you look she did a lot more than I did. To be honest, as much as I appreciate the ease of throwing a meal in the oven straight from the freezer, I'm a bit of a food snob and don't usually like the flavor of food that's been frozen first. Instead, I went halfway and prepped 9 meals worth of raw chicken so that it's cut up (if it was needed) and flavored ahead of time. With about an hour of simple preparation (pouring the ingredients into the bags along with the chicken) I have meals started with the most time consuming parts done and they're ready and waiting in the freezer for me to grab.

And here's the six recipes I used...

Our favorite marinade, tried and true...
Mediterranean Chicken from skinnytaste.com
3 boneless skinless chicken breasts
2 T fresh squeezed Lemon Juice
1 t oregano
1 t garlic, crushed
kosher salt
pepper

I pre-sliced the chicken into strips for easy grilling in a grill pan once thawed. Threw in all of the remaining  ingredients in the bag, pushed out as much air as I could and sealed the bag. Laid flat and put it in the freezer
When it's time to use I'll simply put the bag out on the counter to thaw (or you can that it in the fridge if you're good like that) and when I'm ready, dump the entire contents onto my grill pan and grill.

Another favorite of ours is...
 Ellie Krieger's Teryaki Chicken Thighs
2 lbs boneless skinless chicken thighs
1/4 c soy sauce
2 T brown sugar
2 T dry sherry
2 T rice vinegar
2 garlic cloves, minced
1/4 t red pepper flakes
1 t finely grated ginger
I just dumped all of the above ingredients in a freezer bag, laid it flat, and froze. 
When I'm ready to use this I'll thaw in the fridge or on the counter. Once thawed, heat the broiler to high. Arrange the chicken on a broiler pan skin side down and broil until brown and crispy, 8 to 10 minutes. Flip the chicken and broil until almost cooked through, about 8 minutes longer. Sprinkle with sesame seeds and cook until the seeds turn golden brown and the chicken is done, 1 to 2 minutes longer. 

Oh... and another one of my favorites... 
 Chicken Gyros from The Girl Who Ate Everything
1 1/4 lbs. boneless, skinless chicken breasts
2 teaspoons minced garlic
Juice of 1 lemon (2-3 Tablespoons)
2 teaspoons red wine vinegar
2 Tablespoons extra virgin olive oil
2 heaping Tablespoons plain Greek yogurt
1 Tablespoon dried oregano
Salt and pepper
For these I pre-sliced the chicken and added the remaining ingredients to the bag. Mixed it all around, laid flat and froze. 
Once I'm ready to use I'll create my Tzatziki sauce while the chicken thaws...
 
Tzatziki sauce:
1 cup plain Greek yogurt
1 regular cucumber, peeled and seeded
1 teaspoon minced garlic
1 teaspoon white wine vinegar
Salt and pepper
Squeeze of fresh lemon juice
Extra virgin olive oil

Shred the cucumber or chop in food processor. Wrap in a towel a squeeze to remove as much water as possible. Mix together the yogurt, shredded cucumber, garlic, white wine vinegar, salt and pepper to taste, and lemon juice. Drizzle lightly with olive oil.
Refrigerate for at least 30 minutes before serving to allow the flavors to meld. 

Then...
Cook the chicken as desired, either in the skillet or with the broiler. Once the chicken is completely cooked through, transfer to a plate and let rest for 5 minutes. Heat pitas. Top with chicken, tzatziki sauce, diced tomatoes and sliced onions. Serve immediately. 


I tried this recipe for the first time not long ago and we loved it. I'm hoping it translates from the freezer well...
 Beer Crockpot Chicken from My Daily Dish
6-8 bone in chicken legs
1 can of beer (we used our favorite pale ale)
1/2  t garlic powder
1/2 t basil
1/2 t paprika
1/2 t black pepper
1/2 t salt
Don't bother thawing this bad boy... dump  the entire contents of the bag into a crockpot and heat on high for 4-5 hours or 8-10 hours on low.

And here are two newbies I thought I'd try since I had the extra chicken...
Herb Wine Dump Chicken from Food.com
1 cup red wine
2/3 cup vegetable oil
2 cloves crushed garlic
1/2 lemon, sliced thinly
2 tablespoons minced parsley
1 teaspoon thyme
1 teaspoon basil
1/2 teaspoon salt
1/4 teaspoon pepper
1 1/2 pounds chicken pieces

Place all ingredients into a freezer bag. Lay flat to freeze.
Once ready to cook... Take the bag out of the freezer the night before, making sure the freezer bag is completely sealed. Place the bag on a shelf furthest from the freezer (It works best if the bag is laying flat, although this may not be the best option with a side-by-side refrigerator/freezer).

You can either bake this dish.... Place all ingredients into a large baking dish, turn chicken to coat. Bake until chicken juices run clear (about 30 to 60 minutes depending upon the chicken pieces used). 
or Slow Cook... Put chicken in the bottom of the pot. Pour remaining ingredients over the chicken. Cook on LOW for 6-8 hours or on HIGH for 4-6 hours or until done. 

and...
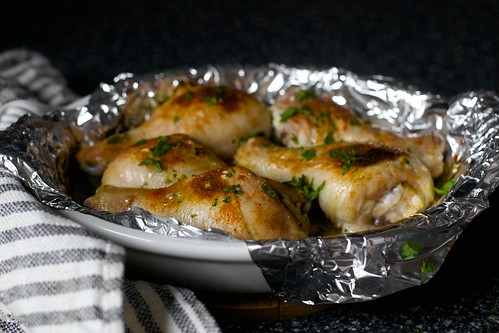
 Buttermilk Roast Chicken by Smitten Kitchen
2 cups buttermilk
5 garlic cloves, peeled and smashed
1 tablespoon table salt
1 tablespoon granulated sugar
1 1/2 teaspoons paprika, plus extra for sprinkling
Lots of freshly ground black pepper
2 1/2 to 3 pounds chicken parts (I used all legs)
Drizzle of olive oil
Mix all ingredients but oil in freezer bag, lay flat and freeze.
When ready to make, thaw in fridge. Once ready, preheat oven to 425 degrees. Line a baking dish with foil  Remove chicken from buttermilk brine and arrange in dish. Drizzle lightly with olive oil, then sprinkle with additional paprika and sea salt to taste. Roast for 30 minutes (for legs; approximately 35 to 40 for breasts), until brown and a bit scorched in spots. Serve immediately.


And that's that! I'll let you know how the recipes turn out as I go but I can assure that if all goes well, I will most definitely be doing this on a regular basis. Just thinking about only having to make one mess in the kitchen for nine meals makes me giddy! 


20 May 2012

Amazing Fruit Salsa


I had this fruit salsa recipe for the first time about a year ago and loved it from the first bite.
My mother-in-law, the baker, brought up some up with her and I believe the recipe came to her from a woman in her home church in SouthWestern PA. 
It's pretty basic in it's ingredients and the results are, as I said, AMAZING! 

2 kiwi, peeled and diced
2 golden delicious apples, peeled, cored and diced
1 lb strawberries, diced
1 8 oz can pineapple chunks, undrained and cut into smaller pieces {or 1 c fresh pineapple}
3 Tbsp peach preserves
2 Tbsp white sugar {next time I make this I'm skipping the sugar to see how it goes}
1 Tbsp brown sugar {same here}
 
Mix all ingredients in a large bowl.  Cover and chill in refrigerator for at least 15 min.

C'est fini!  

This stuff is great with yogurt, granola, cinnamon chips, as fruit pizza, all on it's own...
MMM... SO GOOD! 

25 April 2012

Scrubbing Hard to Reach Places

I can only assume that at one point in time or another you have been faced with an oddly shaped bottle as I often am. Homemade yogurt and kefir have fat/cream in them and that means that lots of goodies stick to the sides of my jars.
Until now I have been shoving steel wool down into the jars and with the very tips of my fingers done the best that I could. I often pulled the not so perfectly clean jars out of the dishwasher, looked over the film left inside, shrugged, and put it away in the cabinet figuring there wasn't much I can do.
BUT NOW...
thanks to a handful of rice, some water, and some amazing biceps...
 
 
 Problem solved!

22 February 2012

PB&J Smoothie

We have taken a break from out standard tropical fruit, spinach, kefir, and yogurt smoothie because I made this once and the kids love it!
Yes, they actually ASK for it!
I found the idea at 100 Days of Real Food. Great site!
I vary from the original a bit but the basics are the same and I want to give credit to the originator of the idea...

My Version:   1/3 c yogurt, 1/3 c kefir or milk, 1/3 c peanut butter, 1 banana, 1 c frozen blueberries

Blend together and serve.


05 September 2011

{Blueberry Waffles with Lemon Icing}

I found this recipe at Vegan Yum Yum. Blueberry and Lemon just may be my favorite combination. With a couple of minor adjustments {for personal prefrence} it's rather yummy. Hubs worried they'd be "no bueno" when he heard the word "vegan" but after assuring him that I made some adjustments, he tried and liked them a lot.
It's a touch of sweet and sour for breakfast. My favorite!

Waffles
What You'll Need:
2 Cups All Purpose Flour
2 tsp Baking Powder
1 tsp Baking Soda
1/2 tsp Salt
3 Tbs Sugar
2 cups kefir {can be subbed with 2/3 c plain yogurt and 1 1/3 c milk}
5 Tbs Water
1/3 Cup Oil
1 Cup Fresh Blueberries (*see note about using frozen)
Spray Oil for the waffle iron

What To Do:
Preheat your waffle iron.
Mix all the dry ingredients together well with a whisk. In another bowl, whisk the wet ingredients together. Combine wet and dry, then gently fold in berries.
Spray your waffle iron with a little bit of oil and make a test waffle. In my waffle maker, 1/2 cup of batter is perfect for a single waffle, and they cook for 10 minutes. Follow the instructions or your preferred directions for your waffle maker. This recipe makes 10 waffles if each waffle uses 1/2 cup of batter.

*If using frozen blueberries, keep them in the freezer until the last second. Reserve 1-2 Tbs of your dry mixture. When you’re ready to add the blueberries, take them out of the freezer, measure them and mix them with the reserved dry mixture. Then fold them into your mixed batter in NO MORE than three (3!!) folds. This will prevent your batter from turning a gray-purple color.

Lemon Icing
What You'll Need:
1 c powdered sugar
1 t lemon juice
zest of 1/2 lemon
2-4 T milk

What To Do:
Mix in a blender until smooth. You can do it without a blender if you feel like sifting your powdered sugar to make sure there are no lumps.

13 July 2011

Thick, Creamy, Tasty Yogurt


Technically this is "round 2" but round one was such a failure I didn't want to share it....
I originally took a stab at this recipe from Passionate Homemaking for crockpot yogurt. I wanted to sweeten it up a little so I found a few suggestions online as to how to best do that and wound up with a rather gross, soupy mix that went straight down the drain.
It has taken me several months to be willing to try again but here we are.
I followed a crockpot free recipe from Passionate Homemaking this time which was super simple because the directions were VERY detailed.


The results?

Vanilla yogurt that tastes much like store bought with maybe a touch more tang. Nothing I can't handle and, to be honest, I'm a picky eater in the way that I only eat things that taste good.
Don't ask me to explain what that means.
Anyway... I have been using yogurt/kefir mix for our morning smoothies lately so we go through yogurt pretty quickly. Stonyfield Organic French Vanilla Whole Milk Yogurt, which is what I buy, usually goes for 4.29 around here. I buy it on sale for 3.99. Half a gallon of organic, grassfed milk, delivered to my door is 3.75 and I made close to three quarts of yogurt from the one half gallon so I've saved about eight dollars.
Yes, I will continue using this recipe and stop or at least seriously cut down on our store bought consumption depending on my schedule.

Worth a shot for your home? I'd say so.

A note on consistency...
I took these pictures right after taking them from the warm water bath. Once I put it in the fridge it thickened to the point that I could turn the jar upside down and it held it's shape.


11 July 2011

{Strawberry Sauce}

Strawberry season is just about over but if you're trying to take advantage of every last bit of it, I mixed up a really yummy sauce that goes great on just about everything from ice cream to crepes that you may wanna try.

Mix about a cup and a half of rinsed, stemmed, and chopped strawberries and one to two tablespoons {more or less to taste} of real maple syrup in a blender until smooth.
 

Our favorite uses are on crepes and mixed in with yogurt. 
So good!


21 June 2011

Green Smoothies

Miss Mak won't eat her greens.
She loves most fruit, dairy, fish, and poultry but won't touch veggies
...until now!
I can't remember where I first heard the idea of sneaking spinach into smoothies but I thought I'd give it a try.
We put over one and a half cups into each batch and can't taste it at all!

I guess you could say this is my "new favorite" and I HIGHLY recommend you throwing a fist-full of greens into your next morning breakfast smoothie, especially if your little ones don't like their veggies either.

Our current favorites...

Strawberry Orange
1 cup Stonyfields Whole Milk French Vanilla Yogurt
1 cup of fresh strawberries {frozen will work}
1 heaping tablespoon of orange juice frozen concentrate
1/2 cup of milk
1 1/2 cups fresh, raw, organic spinach

Apple and Banana
1 banana broken up into pieces
1/2 an apple, with skins on
1 cup fresh or frozen grapes
1 cup Stonyfields Whole Milk French Vanilla Yogurt
1 1/2 cups fresh, raw, organic spinach
1/2 cup milk

I've heard about Jessica Seinfeld's cook Deceptively Delicious which is about sneaking veggies and other healthy stuff into stuff your kids will eat. Do you have it? Have you tried it? Do you have any thoughts on it?

10 May 2011

What on Earth is Kefir?!

Fairly recently I realized that I have used kefir (officially pronounced "keh-feer" though I still shamelessly call it "keef-er") in some of my recipes but haven't bothered to tell you what it is. Odds are that, unless you are any level of "earthy-crunchy", you've not heard of it.
In short, kefir is best compared to a "drinkable" plain yogurt in texture and taste. It's made by letting milk (cow, goat, sheep, soy, coconut, etc.) mixed with kefir starter or kefir grains sit out at room temperature for a time (about 24 hours). This lets the milk ferment and what you end up can range anywhere from a thick milk all the way to a cottage cheese texture. Sounds gross, right? And yet that's the same basic process for making yogurt and buttermilk.
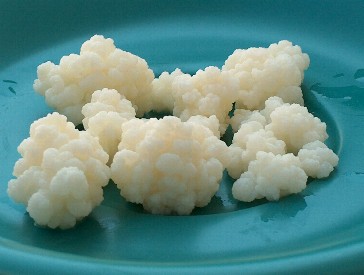
 {kefir grains}
So why do we bother with kefir when we can just have yogurt?
Well, for one, it's cheap. A kefir grain is a living, growing bacteria/yeast. My dear friend gave me some kefir grains to try out because the ones she purchased grew over time and she was able to split them and thankfully they cost me nothing. (They can be purchased inexpensively to get your started.) Once you have them, if you keep them in ideal conditions, they will continue to grow and you'll never have to buy them again.
One of my favorite reasons is that the process of making kefir is ridiculously easy. It takes a glass jar with a lid, a stainless steel siv, a container to keep your finished kefir in, and three minutes a day.
To start, I place my grains in a mason jar and add about a cup of milk. {The amount of milk added depends on the amount of grains you have and how long you want to leave it to culture.}
Then I place the lid on the jar and leave it on the counter for 24 hours. Once you get a feel for what texture and level of tang you like, it's easier to judge how long to leave the kefir grains in. The tangier, the longer, and the greater the health benefits. 24 hours works for us in the spring and summer but we leave it for about 48 hours in the fall and winter.

Once I have the kefir the way I like it, I sift it through a stainless siv into a glass jar I got from Target and put it in the fridge for when I need it.

That's it!

So now that we've established that I'm cheap and lazy I guess I should share with you a few other reasons we use kefir in our home...
Kefir is good for you. Not just yogurt good.... try 6 times as good. I've heard that whereas yogurt has 5 different beneficial probiotics, kefir has at least 30. It's great for your immune system as as most fermented foods. It's easily digestible. (I've read in several places that it helps break down stuff in milk that makes it hard for lactose-intolerant people to digest.) It's anti fungal and antibiotic. It's full of vitamins and minerals and supports overall digestive health.
There are those who claim that since kefir is such a whole food that it cures EVERYTHING. I cannot speak for many of the claims out there but I found this guy who sure loves it! Anyway..

In our house, we use kefir most often as a substitute for buttermilk, sour cream, milk, or yogurt when baking. However, our absolute favorite way to enjoy it is in smoothies. More specifically, a mix of orange juice, maple syrup and vanilla extract. SO GOOD!

So now that I've filled you in on what kefir is, I'll probably share some recipes with you... but don't worry... if you're thinking kefir's not for you, you can always use yogurt in it's place.

03 January 2011

{Breakfast Granola}

I can't speak for anyone but myself here.
I indulged in a bit too much baking {as I'm sure you've assumed} and far too much eating of all the yummy treats.
Thus... we start off the new year with granola.

There are tons of recipes out there with dried fruits and other flavorings but I happen to really like the simplicity of this particular recipe. I pair it with, my favorite, Stony Fields French Vanilla or plain yogurt and a touch of maple syrup.
The way I've made it is with quick oats, as the original recipe calls for but I've had no problem using whole slow cooking oats. Maybe a little more to chew but the flavor is still good.


Breakfast Granola
{no idea where this recipe is from}
What You'll Need: 
1 c quick cooking Rolled Oats
1/2 c shredded coconut {sweetened or unsweetened work}
1/2 c slivered almonds
3 T vegetable oil
2 T honey

What To Do:
Preheat to 350. 
Mix all ingredients well, pour onto a baking pan with sides {I use a jelly roll pan} and bake for 10 minutes. Removed from oven, stir well, and bake for another 10 minutes or until browned. You'll want to watch the last few minutes carefully since it can burn if in too long. {My oven only requires it to bake for about 18 minutes.}Let cool and store in air tight container.
{As you can see, I quadrupled this recipe. I split it up on two pans for baking.}

12 August 2010

{Canning Peaches}


if you can boil water, you can can. consider the following a quick guide to canning peaches. if you have questions, feel free to ask me. if you are brand new to canning and have lots of questions, i highly recommend the Ball Blue Book or Ball Complete Book of Home Preserving to get you started. 
so, without further ado... my setup...

{above}
cold water source to cool peaches : hot water source to keep jars warm
{below} my stovetop... small pan to boil water for jar tops : pan of simple syrup {1 1/4 c sugar and 5 1/2 c water, boil then keep hot} : large pot for boiling jars {i use a hot water canner} : pot of boiling water to peel peaches

and here's how it's done...
fill your jars with hot water to warm up the class or, as i do, stick them into a sink full of hot water. let them sit until you're ready to pack them.


to peel: bring a pot of water to a rolling boil with enough water to cover the peaches and boil for 60 seconds. immediately drop into cold water and let sit for a couple of minutes. doing this loosens the skins and the peels practically fall off. cut in half by making a cut all the way around the pear and then wiggling the knife to work the halves apart or cut them into slices. remove the pit. {i was told that putting a peach pit into each jar helps keep the peaches from discoloring over time. i cannot confirm this to be true but i do it just the same so at this point, save your pits if you'd like.} 


{above} you'll notice that the top peach's pit broke into two. in my experience, this means the peach is very ripe. it will work just as well and taste just as good but it may be a little mushy and not cut as easily as the peach below it with the pit that stayed in tact on one side.

how beautiful are these?!
while you're cutting up all your peaches, boil water in a small pan and add your lids. mix your water and sugar together and boil to make your simple syrup. keep this hot and handy for the next step. 


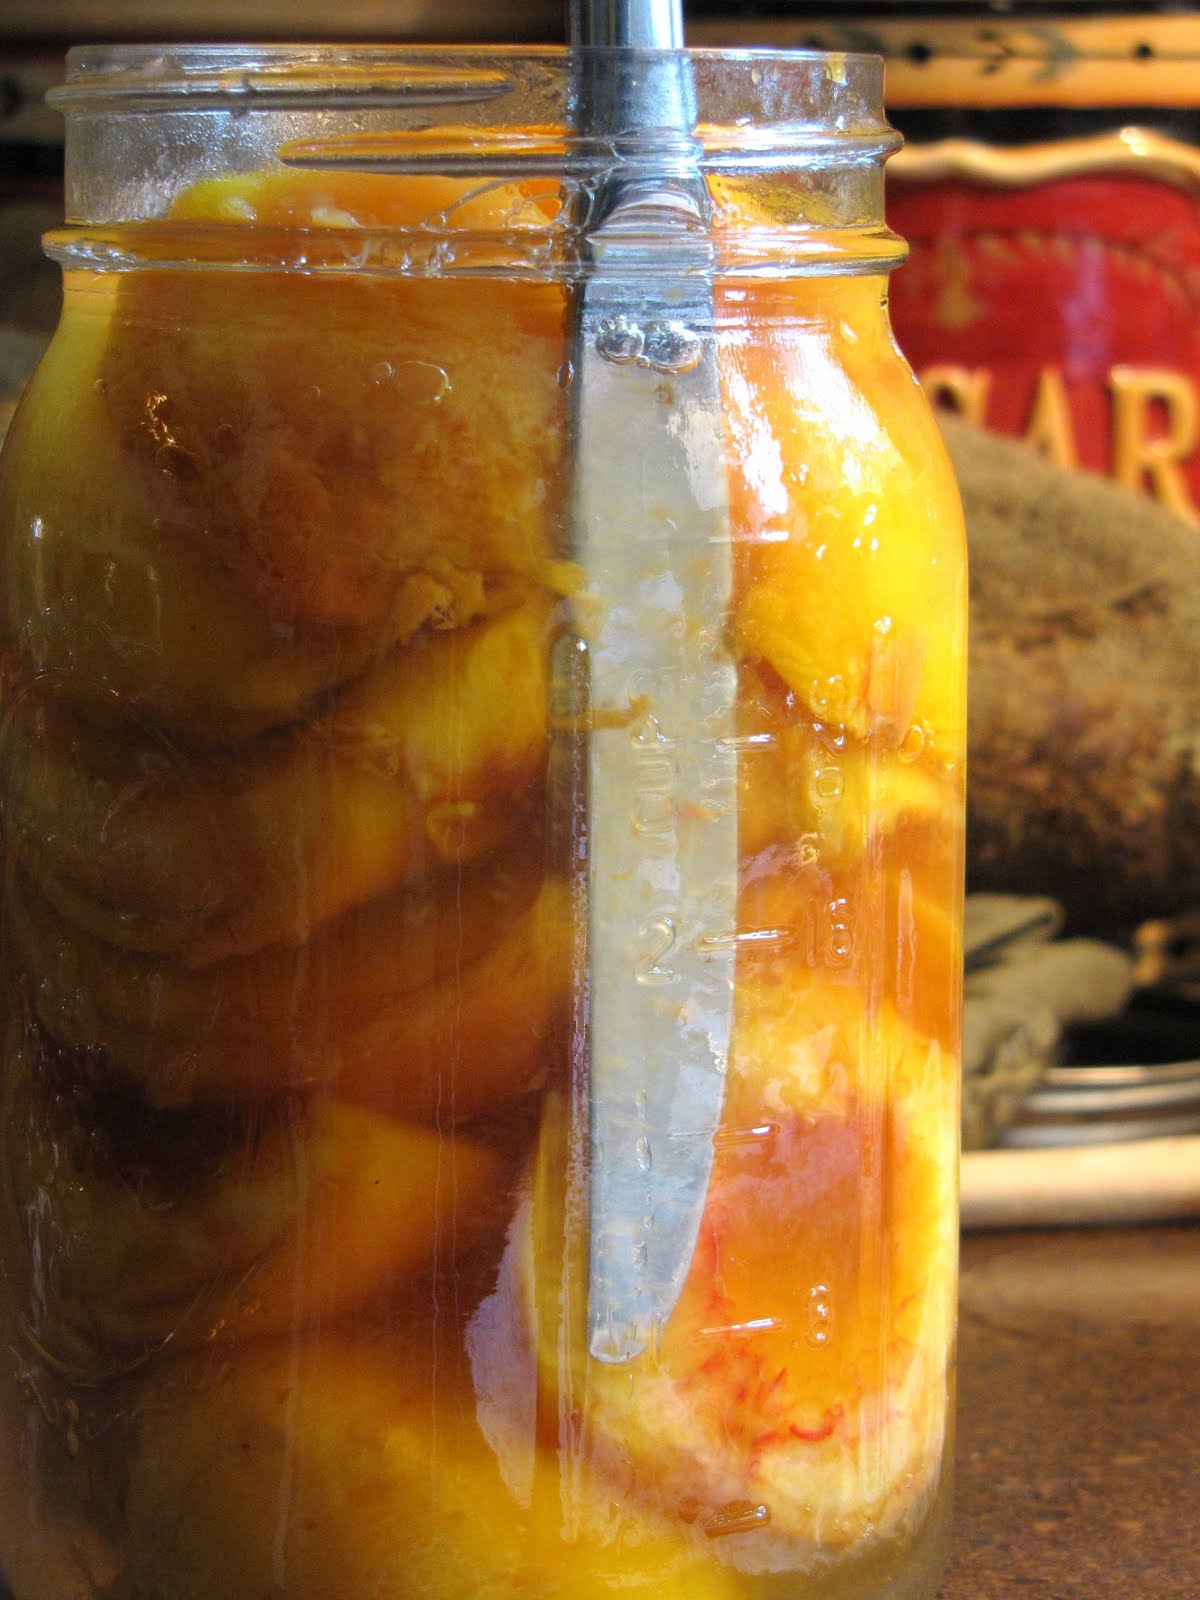
fill the jars with peaches so they're tightly packed but don't push so hard that you start squishing the peaches. using a ladle, pour in the hot simple syrup into the jar to the large rim at the neck of the jar. use a clean knife to slide down the side of the jar and wiggle it to release the air from in between the peaches and top off the jar with syrup  and leave 1/2" gap known as "headspace". 


once jar is filled, use a warm towel to wipe the rim of your jar and put the lid in place. screw on a band but only to fingertip-tight, NOT tight tight. place cans into canner on wire rack to keep warm until all your jars are filled.


hot water baths hold 7 jars. once the rack is filled, lower it CAREFULLY down into the water and bring it up to a rolling boil. once this is achieved, boil pint jars for 20 minutes and quart jars for 25. then turn off the burner, remove the lid, and let cool for 5 minutes before removing.


let jars sit out on your counter overnight until they cool and then store until you're ready to eat.  
 
these are great over vanilla ice cream or with yogurt!

LinkWithin

Related Posts with Thumbnails