He tends his flock like a shepherd: He gathers the lambs in his arms and carries them close to his heart;
he gently leads those that have young
. {Isaiah 40:11}

Showing posts with label Recipes. Show all posts

04 December 2013

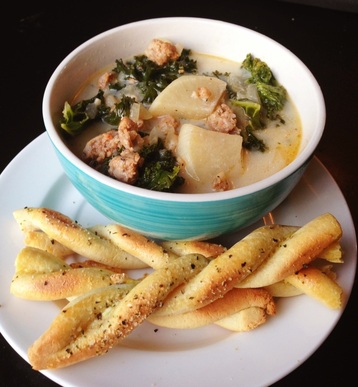
Zuppa Toscana

When we started eating a Paleo diet we began with a lot of salads. Since it was mid-spring/early summer it was pretty easy to come up with fresh ingredients and quick meals but as we got deeper and deeper into fall and the fresh ingredients became harder and harder to find, I began to get nervous that I was going to fall back into old habits just to get by. 
This week I thought I'd share a few recipes that have seriously helped our family from feeling the "winter pinch" and keep on track and best yet, they're delicious! 
Amy's image found at Paleo Cupboard
I liked this recipe from the start but it took Hubs a couple of tries to really like it and now he loves it. I made it just this week and he was raving, which is quite abnormal for him. Either way, the sweetness of the turnips may throw you a curve at first bite but the flavors meld so well together and what's better, you can throw this recipe together super fast. 
(Some Ingredients: chicken broth, sausage, turnips, kale, almond milk, garlic, onion)

03 December 2013

Roasted Chicken and Butternut Soup

When we started eating a Paleo diet we began with a lot of salads. Since it was mid-spring/early summer it was pretty easy to come up with fresh ingredients and quick meals but as we got deeper and deeper into fall and the fresh ingredients became harder and harder to find, I began to get nervous that I was going to fall back into old habits just to get by. 
This week I thought I'd share a few recipes that have seriously helped our family from feeling the "winter pinch" and keep on track and best yet, they're delicious! 
Today...

Martha Stewart's 
Roasted Chicken and Butternut Soup
originally found on MarthaStewart.com
and a version with a couple of my own tweaks found here.
It's simple to put together and it's absolutely delicious. That's really all I need to say. Seriously, just try it. 
(Ingredients: chicken thighs, onion, butternut, chicken broth, cumin, salt, pepper, lemon juice)

02 December 2013

Chocolate Chili

When we started eating a Paleo diet we began with a lot of salads. Since it was mid-spring/early summer it was pretty easy to come up with fresh ingredients and quick meals but as we got deeper and deeper into fall and the fresh ingredients became harder and harder to find, I began to get nervous that I was going to fall back into old habits just to get by. 
This week I thought I'd share a few recipes that have seriously helped our family from feeling the "winter pinch" and keep on track and best yet, they're delicious! 
First up...

Melissa Joulwan's
Chocolate Chili 
Image from The Clothes Make the Girl
I make Melissa's recipe about once a week and I always double the recipe. It has been a delicious Sunday lunch while watching whatever games happen to be on and it's great reheated for lunches (and that's coming from a girl who does NOT enjoy leftovers). 
The only thing I do different from Melissa's original recipe is hold back on some of the chili powder. It's not hot, per se, (and I'm a wimp when it comes to heat) it's just a bit too much for our kids' delicate palates.


30 October 2013

No Eggs? No Problem!

Since we've been changing our eating habits I've begun to have some random ingredients around the house. I'll be honest, the bag of chia seeds I purchased sat in the cabinet untouched for several months before I found a purpose.
And then I ran out of eggs. 
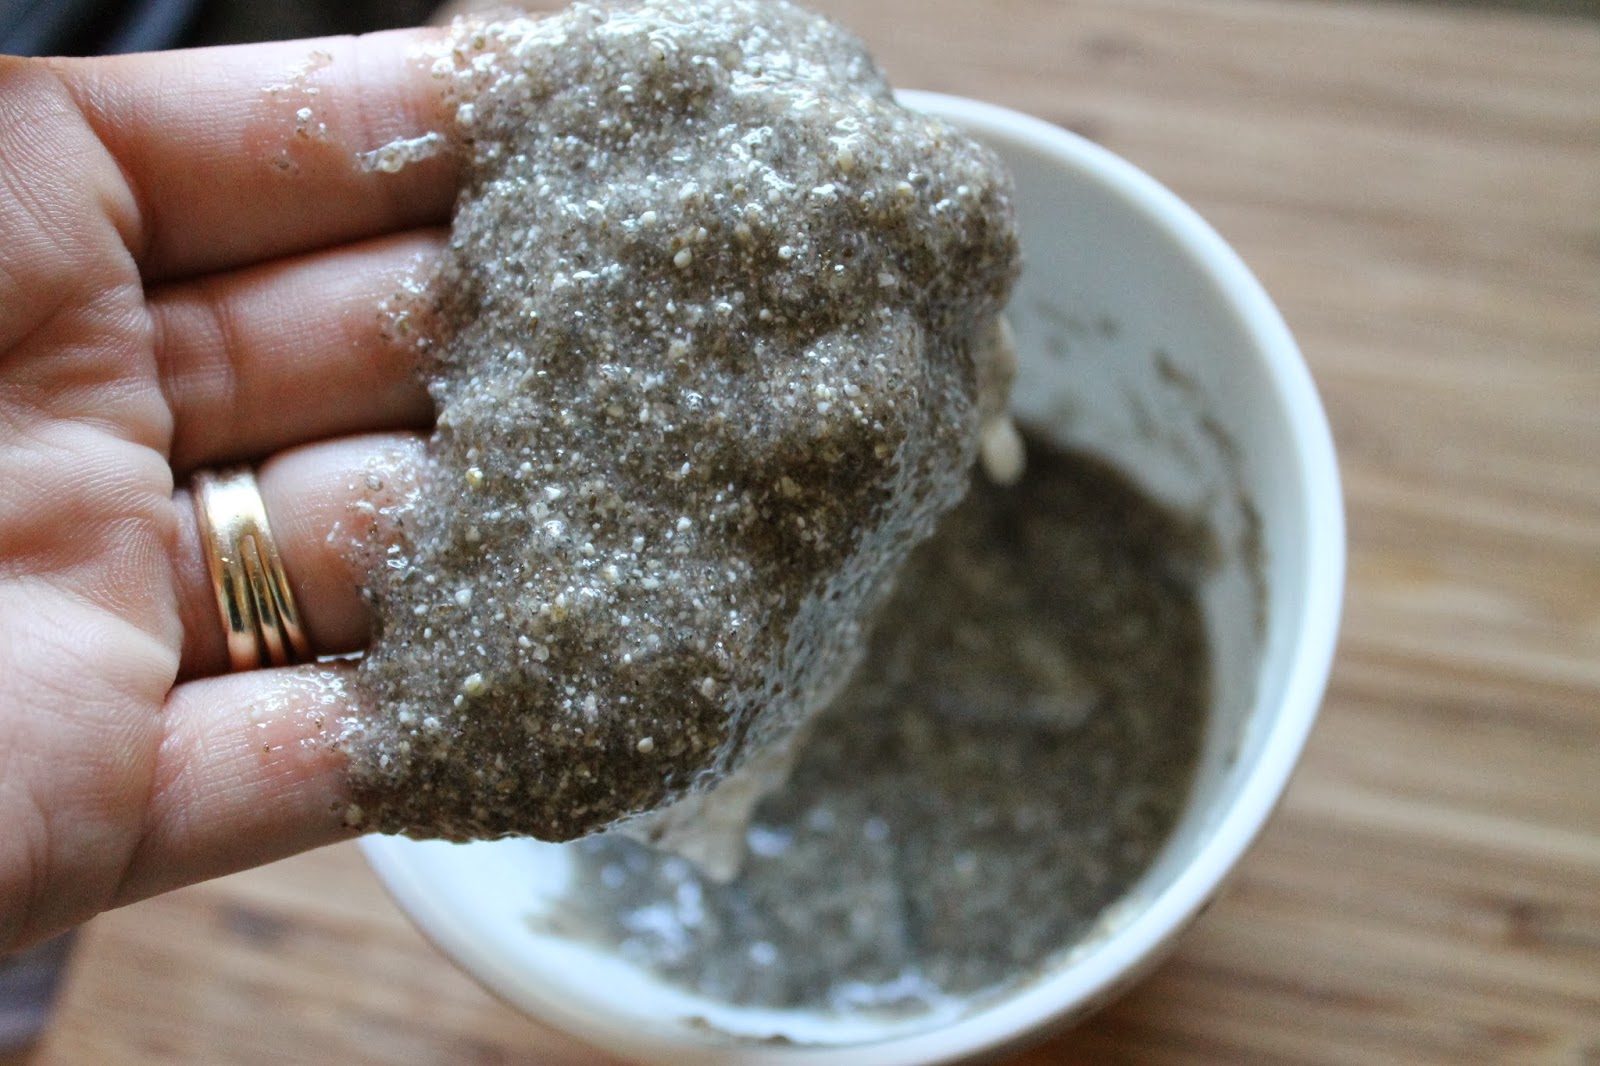
Thanks to the good ol' interwebs I found out that that bag of odd black seeds would work as a handy substitute. 
You'll Need:
1 T chia seeds
3 T water

To Do:
Using a coffee or spice grinder (I supposed a morter and pestel would work as well), grind the seeds to a fine powder. 
In a small bowl, combine the seed powder and water and stir with a fork until well mixed.
Let sit for 10 or so minutes until thickened to a nice eggy consistency.
Use as a single egg replacement and duplicate as needed. 


See, maybe oddball ingredients aren't so bad to have on hand after all! 


17 September 2013

Family Friendly "Jello"

I don't know about you but our kids love them some jiggly Jello and since actual Jello isn't exactly Paleo approved (corn byproduct, artificial flavoring, good ol' red dye #40, and aspartame, blah, blah, blah...) It's just another box I pick up, browse over the ingredients, and put back on the shelf with a saddened sigh.
But no more!
I found a super simple recipe that I can feel good about and now it's a regular snack in our house!
I'm offering the basic recipe here but what's fantastic is that it's a very flexible recipe.
First things first, gelatin (the stuff that makes Jello and "Jello" alike all jiggly) is, oddly enough, from animal collagen found in its bones, tendons, etc. It's put in many food items (marshmallows, candy, etc.) because of the consistency it creates. It's also known to have many health benefits for your joints, nails, hair, skin, and digestive health and since our family sees good digestive health as the key to good health in general, we try to eat it regularly. The key to consuming gelatin for health purposes has a great deal to do with the source as well and whereas gelatin from grass-fed beef is ideal, conventional gelatin is better than nothing.

So without further ado...
For Tea Gelatin:
You'll Need: 
4 tbsp Great Lakes Beef Gelatin or 4 packets (1 box) Knox unflavored Gelatin
1 cup cold water
1-2 tbsp honey (optional)
3 cups boiling water
4 flavored tea bags

What To Do:
Start by placing gelatin in the 1 cup of cold water, stir to incorporate, let sit for 5 minutes.
Place the 4 tea bags in the hot 3 cups of water and let steep for 10 or so minutes. Remove the tea bags, add in the honey (how much you add is to taste), stir to mix. By now the gelatin mixture will be a solid mass. Add the "blob" of gelatin into the hot water and stir well until gelatin dissolves. (I sometimes pour this mixture back into a saucepan and heat a little if I have let the ingredients cool too much.) Pour entire contents into an ungreased 9x13 pan and cool for 3 or so hours. (It will be edible sooner but it truly firms up after the whole 3 hours.) Enjoy!
For Juice Gelatin:
You'll Need: 
4 tbsp Great Lakes Beef Gelatin or 4 packets (1 box) Knox unflavored Gelatin
1 cup cold water
3 cups juice or other flavored liquid you'd enjoy eating in gelatinous form

What To Do:
Start by placing gelatin in the 1 cup of cold water, stir to incorporate, let sit for 5 minutes.
Meanwhile, heat your juice on the stove top until steaming (it doesn't need to boil). By now the gelatin mixture will be a solid mass. Add the "blob" of gelatin into the hot juice and stir well until gelatin dissolves. (I sometimes pour this mixture back into a saucepan and heat a little if I have let the ingredients cool too much.) Pour entire contents into an ungreased 9x13 pan and cool for 3 or so hours. (It will be edible sooner but it truly firms up after the whole 3 hours.) Enjoy!

22 July 2013

Our Granola Recipe


Maybe this should be titled "THE Granola Recipe".
Yup. It's that good.
I'm sharing this because I've been asked for it a few times since Baby Sister's wedding.
That's because we made enough of it for 150 people as favors for the wedding so the goodness was shared with some of our favorite people.
The great thing about granola is that it can be played with and you'll still get great results so I'll share my most used recipe with the encouragement that you play around using things you like...

"THE Granola Recipe"
(start to finish: 30 minutes or so :  yield: about 12 cups, 3 - qt mason jars)

6 cups of rolled oats (not quick oats)
2 c sliced almonds, raw
1.5 c sunflower seeds, shelled and raw
2/3 c coconut oil
1 c pure maple syrup
2 c raisins (optional)

Set the oven to 325.
In a large mixing bowl, mix oats, coconut, almonds, and seeds. Set aside. 
In a medium saucepan over medium/low heat,  melt coconut oil and maple syrup until they are well mixed. This will not take long since coconut oil's melting point is so low, maybe 2-3 minutes. 
Pour melted oil and syrup over dry ingredients and stir until all is well coated. 
Pour enough of the mixture onto a baking sheet so that you have a thin layer of granola and are able to stir it around without spilling everywhere. 
Place into oven and bake for 5 minutes at a time, stirring after every 5, until the granola is a nice golden brown. Between 15-20 minutes per batch. (The mixture will not likely feel crunchy while still hot. The crunch comes as it cools so look for color, not crunch.)
Let cool for a few minutes. 
Once cool, either pour into a large bowl to break up any chunks and to stir in raisins, or place directly into storage container(s). (We use three quart sized mason jars.)

The kids love their granola like they do cereal, in a bowl with milk. I prefer it over some homemade yogurt and Hubs inevitably ends up taking it to work with him with milk and blueberries. It's also great over ice cream.
No matter how you like it, you've really got to try this deliciousness!

* Depending on how you feel about certain foods, you can substitute some of the ingredients and get similar flavor results. For example, you can use vegetable oil or canola oil instead of coconut oil (though I would not recommend it). You can also substitute honey for maple syrup or a mixture of the two.


09 May 2013

Kale Chips

I've seen these before.
You probably have too.
They look super healthy and therefor a bit... well..."ehh".
But I was curious.
So we tried them.
They're oddly yummy!
Like... crunchy air.
The kids loved them.
A little too much.
I've made two batches in the past two days and Hubs hasn't had any because they're gone before he gets home.
CJ, Bean, and I are veggie lovers anyway so that may be part of it.
Yeah... I recommend trying them at least.
You just might like them too.


02 May 2013

"Best Fajita Marinade"

 We are headed towards a Paleo diet in our house.
I won't say we're committed... it's more like a modified version of it.
For those of you who don't know what Paleo is here's a condensed version.
aka caveman diet, it gets you back to eating like they did WAY back when. no grains, 
no corn, no legumes - that means peanuts (which I recently cut out anyway because 
apparently it made Baby J's eczema flare up), little to no dairy (butter and ghee are a.o.k.), 
lots of naturally full fat stuff like beef, coconut, avocados, nuts, and loads of veggies. 
We've been working our way towards this diet for a few weeks now and I honestly feel better and have more energy than I've had in a while. Now, keep in mind that I have also been in a pregnant or recently pregnant phase for over five years straight. So my return of energy may be due to Baby J's 6 month birthday that is fast approaching even though I am still not getting a full night's sleep. Either way, the weight seems to be falling off faster as I have been losing weight at a noticeable rate. It's enough reason for me to keep going.
So all of that is to intro you into this yummy recipe that is quite possibly THE best fajita marinade, as the original sharer of this recipe assures me it is. (Found here.)
As usual... I tweeked it EVER so slightly and here's what I ended up with... 

What' You'll Need:
1 lb chicken thighs
1/2 cup fresh lime juice
1/4 cup oil (I've used peanut but ghee, coconut oil, or palm oil may be better)
3 garlic cloves, minced
3 tablespoons fresh cilantro, chopped
2 teaspoons chili powder
1/2 teaspoon ground cumin
1/4 teaspoon salt
What To Do:
Mix the marinade in a large bowl, whisk well, add chicken thighs and stir to cover. Let sit for at least an hour. Then grill them up! For the chicken thighs on a gas grill it takes 8-10 minutes to grill through (4 mins on each side). Once done, place on a plate and tent with foil for 5-10 minutes. Slice meat thinly against the grain and enjoy! 
We eat ours over salad greens with peppers and onions cooked on the grill with salt and salt, cherry tomato pureed in the blender,  guacamole, and a touch of sour cream. I've made this twice in the past week. 
So delicious!

04 April 2013

Ghee

Every heard of ghee (pronounced gee)? How 'bout butter oil? Clarified butter?
I hadn't until about six months ago when I was looking for healthy cooking oils as alternatives to the old standbys that, I'm discovering, aren't as fantastic as we're told they are. (More about that at the bottom of the post if you're interested.)
I like coconut oil for baking, granola, curry, and other sweeter cooking but the coconut flavor can come through so if it's a savory dish I like more of a butter taste.


Anyway, ghee is original to South Asia and is used for rices and lentils mostly but it is delicious on steamed vegetables. From what I've read when you heat the butter the milk solids are removed so it has been known to be a good option for people with a low dairy tolerance. It's great for frying and sauteing with a high smoke point of 482 F and has been shown to lower bad cholesterol as naturally saturated fat foods will do. (Yes, saturated fat may actually be GOOD for you and low fat just might be bad but that's another discussion for another day).

So... where can you get ghee?
I have seen it in stores sold in jars but it's so simple to make and I know exactly what the butter source is so I quickly and easily make my own.
Here's how...
Place one cup of the butter (salted or unsalted, I've done both and they're both fine) in a saucepan.
No, not all butter is created equal. Grassfed and the darkest yellow you can find are best.
I personally prefer Kerrygold blocks wrapped in foil, not the spreadable tubs and have found that the best price around is at Trader Joes.
Heat the butter on medium high heat until it begins to boil.
There will be two foaming stages. Some people skim the foam off the top but I have seen no need to do this plus I'm cheap and hate to see any butter wasted to the skimming process.
The butter will foam once, as shown above , and then clear up...
until it foams the second time. According to Alton Brown the second foam indicates that the ghee is done. It will be a deep golden yellow and the milk solids will fall to the bottom of the pan..
or, as in my case, the boiling will cause some of the milk solids to rise to the top.
Strain how ghee into a heatproof jar and let cool.
(milk solids left in the pan)

The first time I did this I was shocked that the ghee was no longer liquid after it cooled. Instead it was somewhat of a gritty, grainy texture but it melts right back to liquid once heated.

So why not olive oil or canola?
First, I am not a nutritionist and have conducted no personal studies but our families eating mantra is "as God intended it" which basically just means with as little processing, pesticides, and tampering with as possible. If it required intense processes and intimidating machines... we avoid it. That's about as simple as I can get.

Olive oil is great IF you don't overheat it. Research has shown that olive oil can be damaged at temperatures as low as 320 F. Some go as far as to describe its post heated makeup as "toxic".  We use it on salads and just about anything else we don't heat.

Canola Oil  is a product that all together gives me the willies. It's sold as a health product but nothing about it makes me feel good. According to Sally Fallon, co-founder of the Weston A. Price Foundation writes in her cookbook Nourishing Traditions... 
"the newest oil on the market, canola oil was developed from rape seed ... which is considered unsuited to human consumption because it contains a long-chain fatty acid called erucic acid, which under some circumstances is associated with fibrotic heart lesions. Canola oil was bred to contain little if any erucic acid and has drawn the attention of nutritionists because of its high oleicacid content. but there are some indications that canola oil presents dangers of its own. it has a high sulphur content and goes rancid easily ... during the deodorizing process, the omega 3 fatty acids of processed canola oil are transformed into trans fatty acids..."

Vegetable Oil is almost always corn oil or soy oil and both of those ingredients are high on the GMO list. For that reason, alone, I avoid it. 

The reality is that you can find research to support just about any theory you have but these are two instances that I haven't been able to refute to my satisfaction and for our family it's "better safe than sorry".


27 March 2013

Homemade Saltines

I mentioned that I made these a few weeks ago when the kids were sick and I wasn't about to run four kids out the door so I found this recipe at Restless Chipotle.
For ease I copied it word for word here...
--------------------------------------------------------------------------------------------------------------
       4 cups flour (all purpose, bread, whole wheat or a mixture- be creative
       1 Tablespoon Baking Powder
       1/4 cup unsalted butter
       1 1/3 cup whole milk
       Salt crystals for sprinkling
       1 egg yolk + 1 tablespoon water OR 1 egg white + 1 tablespoon water, beaten together for egg wash.
  1. Mix together the flour, baking powder, and butter .
  2. If you are adding seasonings mix those in with the dry ingredients.
  3. Cut butter into flour mixture until it forms coarse crumbs.
  4. Add the milk and knead to form a ball.
  5. Divide in 4 parts and roll out paper thin on a floured surface. The thinner they are the crisper they will be.
  6. Cut the dough into squares (a pizza wheel works great for that!)
  7. Place on an ungreased cookie sheet and prick all over with a fork.
  8. Brush with the egg wash and sprinkle with salt (or cracked pepper ..or..)
  9. Bake at 325 until golden brown..about 15- 20 minutes. (check after 10 minutes)
Notes:
The yield of this recipe is largely dependent on how you cut the crackers. The nutrition information is based on cutting them into 36 large crackers.
---------------------------------------------------------------------------------------------------------------
I switched out a portion of the white flour for home ground wheat flour.
Another tip is to roll the dough as thin as you are able. The thinner the better and the more authentic the taste.
These were really easy, rather quick, and tasty. I don't think they replace regular saltines for flavor because, let's be honest, there's nothing like a saltine... but it's a really good alternative if you're trying to do more homemade or just don't want to run to the store and they're so buttery you can't eat just one. I know I sure didn't!


07 January 2013

Best White Cake & Buttercream Recipes


Tomorrow is Miss Mak's third birthday and we had my side of the family over last night to celebrate with the usual cake and coffee.
I made a similar cake to the one I made for her last year but this time with a different recipe. 

Pinterest, or course, claims this is "the best" so I wanted to give it a shot for myself. It is truly delicious. 
To be honest, I figured one cake is just as good as another as long as the flavor was good but this one was noticeably good in texture and flavor. The recipe is found at Recipe Girl and since I am not exactly the best baker I followed her instructions to the T. It starts with a boxed white cake mix and adds a few things along with a cup of sour cream. It's quick to put together too. I kinda love everything about it.

As for the buttercream recipe, I also found it on Pinterest (originally from Savory Sweet Life) and I picked this one because it was one of the only buttercream recipes I could find that actually used butter and not shortening. You can tweak the measurements just a pinch to get them how you'd like. I stuck with two tablespoons of milk and added the fourth cup of confectioners sugar, in case you were wondering.

I opted for a pink "hombre" cake where each layer became a darker shade of pink. Since Mak's birthday is in January the lighting isn't that grea tbut I did what I could to show you what we had. 
With a quickly growing family, the 21 of us quickly polished off the cake and left not even a crumb for a good pictures in the morning. 
Yes. It was that good.

04 December 2012

Best Butternut Soup

I mean it.
I believe this is the best butternut recipe I've had to date.
Of course, it's from Martha.
The ingredients are simple.
It's just about as homemade as you can get.
And the flavor is perfect-warm-you-from-the-inside-out-gonna-have-to-share-with-a-friend-delish!
Whew!
Anyway... as usual, I've tinkered just a smidge but the original recipe is right here at Martha Stewart. The recipe below is with my changed but again, the original recipe is HERE.
Martha has this recipe at about an hour from start to finish.
What You'll Need:
4 bone-in, skin-on chicken thighs
1 medium butternut squash, about 2 1/2 lbs, peeled, seeded, and diced medium.
1 small onion, diced medium
2 T olive oil
salt and pepper
4 c chicken broth or water
1/4 t ground cumin
1 to 2 T fresh lemon juice
What To Do:
Heat oven to 425. In a roasting pan or jelly roll pan layer whole chicken thighs, diced squash, and onion, single layer. Sprinkle with salt, pepper, and oil,
Roast for 30 minutes, no turning necessary.
Let cool for a few minutes and remove chicken thighs to another plate for just a moment to cool further.
In a soup pot add 1/3 of the roasted squash and onion, 4 cups of broth, and 1/4 t cumin and begin to heat over medium heat.
Meanwhile, using a blender or food processor, puree the remaining 2/3 of the squash and add puree to the warming broth.
Add the 4 chicken thighs to the food processor or blender and pulse several times to break up.
Add chicken to the warming broth and heat through.
Right before serving, add lemon juice to taste and serve immediately or...
  as I did, place in a jars to cool and share. 
Hubs likes it! Kiddos like it! I love it!
I meant it! Try this! You won't regret it!
Happy Tuesday!


LinkWithin

Related Posts with Thumbnails