He tends his flock like a shepherd: He gathers the lambs in his arms and carries them close to his heart;
he gently leads those that have young
. {Isaiah 40:11}

Showing posts with label 25 Projects Before Christmas. Show all posts

06 December 2010

Tree Skirt... Done!

I'm going to admit from the very beginning that I enjoyed making the top but when it came to quilting the whole piece and attacheing the binding I... well... completely lost my steam. I'd like to blame in on the pregnancy. I just lost my motivation on this one. The only thing that got me through was knowing I'd soon be covering the ugly base of our tree.
So yes... I'm happy to cross another item off my list.

Don't get me wrong. It wasn't hard. It took me about one full day's worth of work. Totally doable. It just requires a little motivation.

You can find this pattern at Sew Mama Sew. Everything you need to make your own is right there!
Have a happy, restful weekend!

02 December 2010

5 Minute Custom Pillowcase

Another project that's easy to customize and is fun to make. 
 
 
Wanna make your own? Head over to MADE to learn how.


30 November 2010

Dishtowel Aprons for Kiddos & You

{You may notice that I'm not offering specific measurements. I'll tell you what I used for my 27 month old but yours will be based on your little one's measurements and the specific towel you use} 

What You'll Need: 
Dish Towel {got mine at the dollar store}
Pre-bought bias tape OR you can easily make your own

What To Do: 
Measure your munchkin from the top of their chest to the middle of their thigh. Cut your towel to length.
{Our towel measured 25"x17" and CJ measured 16" so I cut off 9" 
so I ended up with one16"x17" body piece and one 9"x 17" pocket piece}
 Flip your two pieces over to their "wrong-sides" and lay the pocket piece on top of the larger body piece and line up the edges. Sew a 1/2" seam.
{In our case, I laid the 16"x17" piece face-down and laid my 9
x17" piece face-down on top of it. }
*If you're using bias tape for the top of the pocket...
Sew it into place now across the end of the pocket piece. Fold your edges under to finish the edges.
 
Fold up your pocket piece and pin it into position. 
Sew up the sides of your pockets and, dividing the pocket into thirds, sew two more lines to create three pockets. 
Measure across your little one's collar bone to get the width of the top of your apron. 
{You may notice I made CJ's a bit wide. I made it a little 
longer in the hopes that it will take him longer to outgrow}
Center your width measurement and mark it at the top of your apron. Draw and cut two lines from the edge of your pocket to the ends of that line. 
If desired, cover the top of your apron with bias tape.
Measure around you peanut's waist, double it.
Cut your bias tape to length and stitch down its length to make a cord. Cut the length in half and stitch onto the back of your apron at the height of your little one's waist.
Then, measure for their neck piece. Cut a piece of bias tape to length and stitch onto the apron at either end of the top of your apron body.
That's it!
{You may find that the next piece is too long, even though you've measured it just right. In that case, consider cutting the neck piece in half and tie it to the right length.}

As for the adult version... 
I cut the fabric for the tie to the length of my waist and doubled it. As for the width, I wanted a medium thick band so I cut it to 7" and folded it in half, right sides together so I ended up with a long thing band. I stitched a 1/4" seam and left a 2" opening to turn. Once turned, I ironed the tube into a long strip, laid it onto one of the long edges of my dishtowel and stitched it into place. 
 The End

29 November 2010

Super Simple PJ Pants

Sweet Hubs' family is ALL.ABOUT.CHRISTMAS. My family... well, not so much. His is all about traditions. I swear, they have a tradition for everything! You can only eat certain things after certain dates...watch specific movies on specific days... drink wassail on Christmas Eve ONLY... hide elves around the house... stockings on the stairs... every ornament they own on the tree until it tips {literally}...planned attire for Christmas day. Okay, you get the point. 
Again, my family... nada. 
So I've determined not to be lame and embrace the Christmas season with all the enthusiasm I can muster. Hubs and I are working on creating our own traditions {some silly, some not} and one of the very first traditions I'm starting this year is that I would like to make Christmas Eve pajamas for the kids. I think I'll make it the one gift they can open Christmas Eve so that they can wear them Christmas Day. I only hope that I make "cool" enough ones that the kids won't mind wearing when they're teens {oh boy}.

As promised... these were super simple... 
You'll Need: 
1 yd fabric of your choice
1/4 yd of second fabric for embellishment {optional}
elastic {1/2" should do}
a pair of pants that currently fit your little one

What To Do: 
Using pants that fit your little one, turn them inside out, fold them in half, and lay them on a folded edge of your fabric as shown.
Cut around your pants leaving at least an inch around the side and two inches along the bottom cuff and waist. Do this twice.
If you choose to do a pocket and/or cuff... grab your second, accent fabric and visit Made-By-Rae for how to do just that. {For Mak's pocket, I chose to make it 5"x4" so I cut my rectangles to 5 1/2"x8"}
 To attach the body pieces of the pants lay your two leg pieces right-sides-together.
Stitch the two seams from the waist to the crotch and stop.
Now, switch your pants around and match up the seams you just made so that it looks like the picture below.
Starting at one cuff, stitch up the inseam of one side, across the crotch, and down the other leg.
For the waist, roll down the top of your pants 1/2", sew using 1/4" seam.
Roll the top down again 1" and sew using a 3/4" seam. Be sure to leave 1" or so to insert the elastic.
 The easiest way to thread the elastic through is to attach one end to a safety pin and feed it through.
Pull your elastic to the tension that fits your little one, cut the excess off and sew the ends together. Turn them inside out and voila!
I LOVE making these. SO easy and SO cute!


22 November 2010

Fleece Hats for the Kids

I just keep crossing things off my list. How fun!
I made Miss Mak's hat using this Martha Stewart tutorial and I winged it on CJ's dino-hat. I plan to make and adjustment to his ear flaps at some point but in the meantime, it'll do the job.

19 November 2010

Holiday Frames

 I have picture frames all over my house. They're in rows, in galleries, on the tables. After a while they start to look a little "blah" and I wanted to give them a little punch for Christmas. It was ridiculously quick, easy and {my favorite }cheap.
I bought several sheets of holiday scrapbook paper {I found a pack of 8 sheets for $1 at JoAnn's by the register}and 2 sheets of 8.5" x 11" black paper for the letters.
I opened the frames, took out the old pictures and put the scrapbook paper in their place. I then found a font I liked on the computer, printed it out and traced it onto my black paper. It's as simple as cutting them out, centering them, and keeping them in place with tape. Put your frame back together and you're done! I've found that just a few little punches of holiday color makes all the difference.
{This gallery is still a work in progress. Note: the crooked pictures and spring-ish ferns.}
Try this for Thanksgiving, Christmas, Valentine's Day, the Spring season, or just because you're in a lime green mood! The possibilities are countless!


18 November 2010

Rag Wreath

If you have several hours of sitting with nothing to do and need to cover up a spot on your sad, empty wall... then THIS, my friend, is the project for you!
You can go out about buy several yards of fabric OR you can use my uber cheap method and shred up an old sheet set. {Okay, admittedly, I did both. The crisp white was an old sheet set that made my itchy and the cream and tan were one yard of fabric each.}I  went out and bought three wire wreath frames {about $2.50 each but I'm sure you can find them cheaper} and two yards of fabric. One frame was 18", two were 12". As I mentioned, I also had a queen sized flat sheet and two pillowcases.
I snipped the fabric, on the salvage edge, every inch and tore it into long strips. I cut those long strips into short strips that varied between 6 and 8 inches. Then... sigh... I sat down on the living room floor for several hours watching movies and hanging out with the kiddos and tied hundreds, maybe thousands, of knots around the frame. 
 After a while... okay, a loooong while I ended up with this.

16 November 2010

Dot Garland

I must say that this was super inexpensive, quick, EaSY and I love the outcome! 

What You'll Need:
scapbook paper/old Christmas cards/any festive paper
circle paper punch of varying sizes
fishing line or other strong cord
hot glue gun or other glue
optional...
white paper, pen, ruler

What To Do:
I recommend skimming through all the directions first and deciding what works best for you. I did enough to go around CJ's whole room in less than an hour with my method.  
OnE: cut out dots from your scrap paper until you run out of paper, patience or your hand cramps.
TwO: create long stips of paper at least 2" wide and tape them together end-to-end. then tape them to your work surface. {using out kitchen counter, we were able to do 10 feet at a time.} 
THrEe: mark a line at a consistent distance apart all the way down your strip. {we marked every 2.5"}
FoUr: Tape one end of your string/wire/line at one end of your paper. stretch the line over your paper and it down to your work surface at the other end.
FiVe: Lay your dots down on each line you've drawn and center them under your line in whatever pattern or chaotic manner you'd like. Then lay a dot of corresponding size next to your line for quick gluing.
SiX: Put a dot of glue on the line/thread/string and place the corresponding dot on top.{I definitely recommend hot glue for this since I was able to get ten feet of dots set up and glued in under five minutes.}

SeVeN: Once glue is dry, un-tape the line and shift it down to do more. Otherwise, cut your line and hang it in place.

15 November 2010

Stockings for the Kiddos

I realize I could just run to the store and purchase a ready made stocking but what's the fun in that? My explanations are long-winded but these took me about 45 minutes to make, each.

Here goes...
What You'll Need: 
1 pattern for stocking {optional. I used a pattern from dear ol' Martha }
1/2 yard of fabric for body of stocking {I like the thickness of fleece}
1/4 yard of fabric for cuff
1/4 yard of fleece for the underside of cuff {again, to add thickness}
2 feet of trim for embellishing cuff
3" x 6" piece of fabric for loop to hang

What To Do: {click on any photos to enlarge}
I did this project two different ways. 
Miss Mak's way:
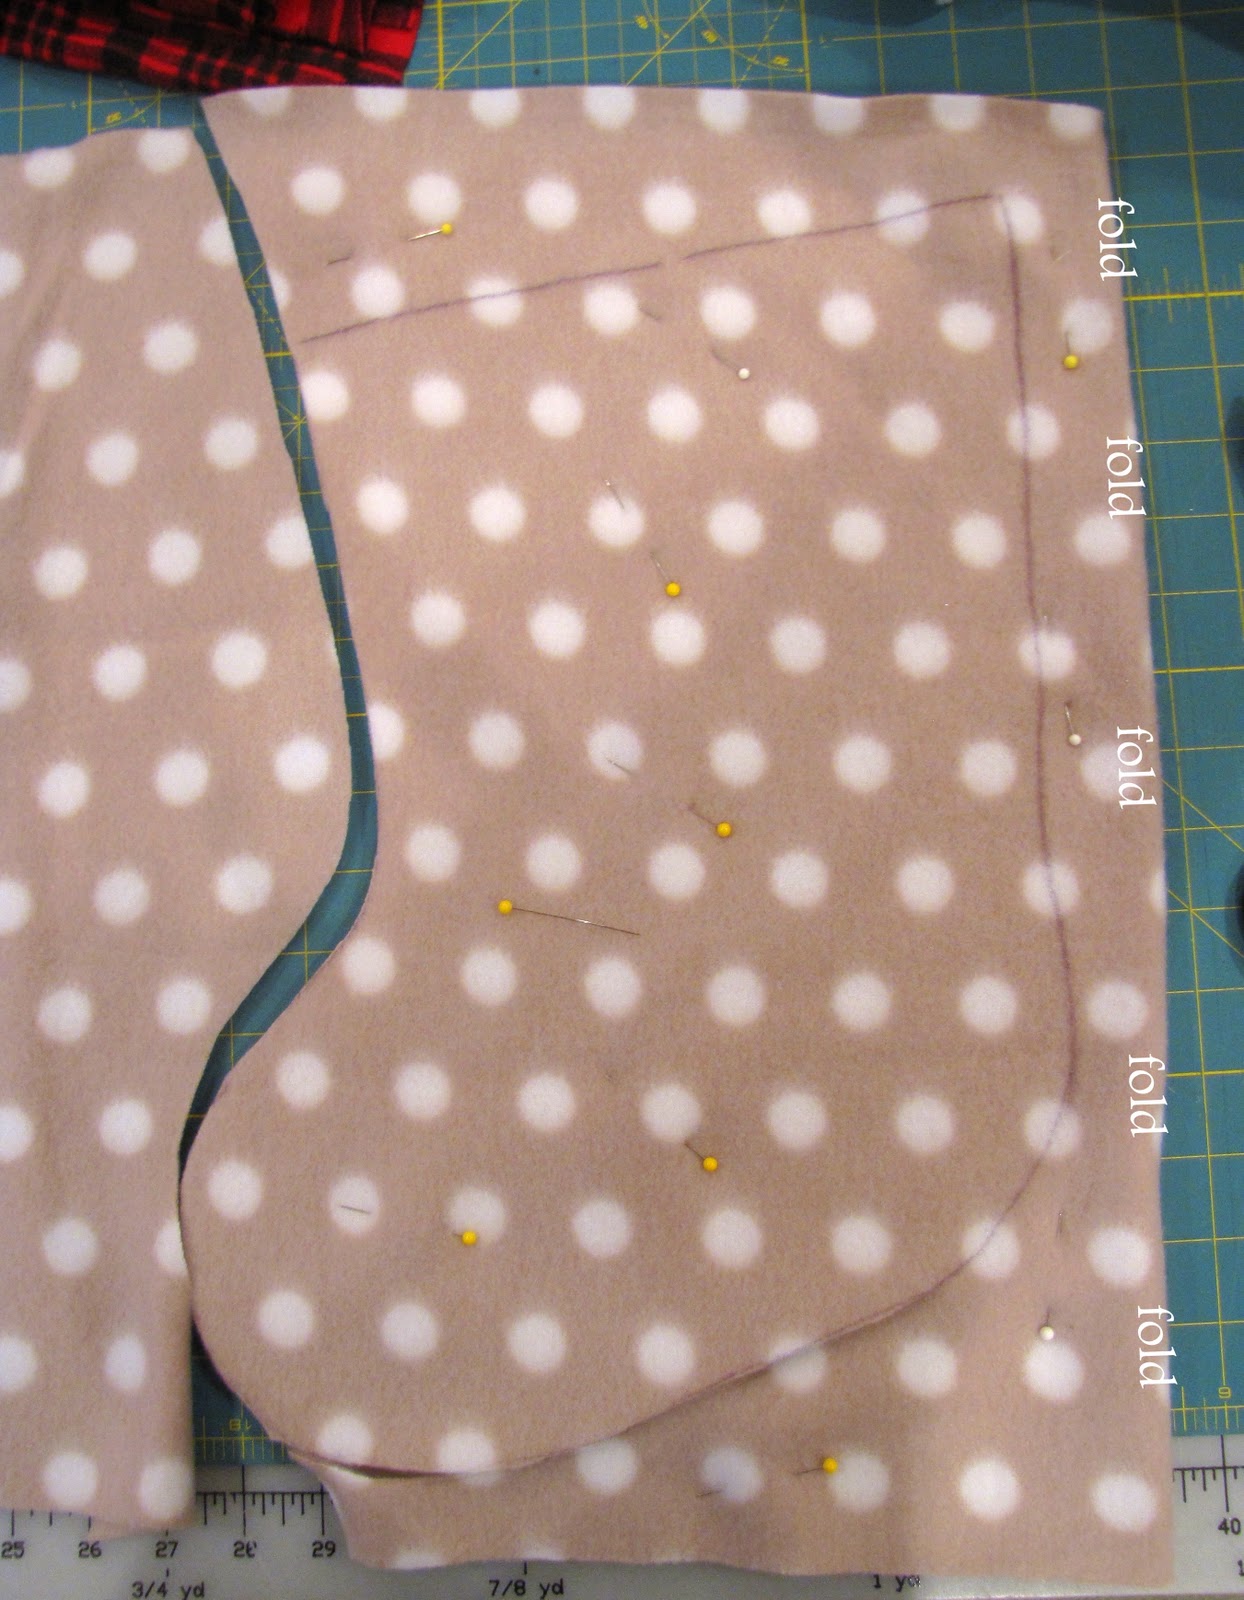
Fold your outter fabric so that the right sides are together and, using several pins, secure your two layers of fabric together. 
For the body of your stocking, freehand, or trace your pattern, onto your outter fabric. As I said, I used a Martha Stewart pattern, specifically, her Birds Stocking Template.
Sew 1/4" seam around the body of the stocking remembering to keep the top open.
For the cuff, place your outter, "pretty" fabric facing right-side-up on your work surface and lay your fleece right-side-down on top of it.
Pin together.
Trace and cut out two cuff pattern pieces.

If adding trim, unpin your outter fabric and fleece on both cuff pieces and lay out your trim on the bottom of your cuff. Sew into place.
{You may have noticed that I didn't pin the trim into place and that's because it was too thin. If you have wide enough trim, I recommend pinning it for sewing.}
Lay your fleece piece on top and pin into place so that, once again, right sides are together. Sew into place.
{This can be a little tricky since you're working so close to the edge. If you have a zipper foot, like the one I used above, I'd use that.}
You'll end up with this... 
Place one body piece right-side-down on your work surface. Place one cuff piece right-side down.  {Yes, it sounds backwards, but just trust me.}Stitch the cuff into place. Repeat this for the other body and cuff pieces.
Lay your two pieces together so that the body pieces are facing right-sides-together and stitch around the body of the stocking ONLY. Do not stitch the cuff. 
Once stitched, turn the stocking body right-side-out.
For the loop, use your 3" x 6" piece of fabric and fold it in half so that it's now 1.5" x 6". 
Open it up and bring the two edges in to the center line, like shown below. 
Press these two edges.
Keeping the two edges you just pressed folded, refold in half so you end up with a piece that is .75" x 6".
Sew down the 6" length.
Fold your loop fabric in half, to create the loop, and pin into place on the cuff. Make sure the actual loop is facing IN when you pin it into place. {That's hard to explain so just take a good look at the picture below. The open end of the loop piece is in and tilted down. Once you turn the cuff, the loop point upward.}
Stitch up the sides of the cuff. 
I recommend back-stitching over the loop a few times for extra stability.
Fold the cuff down and you're done!

The Mr. CeeJ way:
Cut your two body pieces out of the outter fabric {in this case, red plaid} and two out of a thick fabric {in this case, off-white fleece}. 
Layer the body pieces on your work surface as follows: first, fleece right-side-down. second, outter {plaid} fabric right-side-up. third, outter fabric right-side-down. fourth, fleece, right-side-up. 
Pin and stitch a 1/4" seam around the outside, leaving the top open.
Cut two pieces for the cuff from a piece of fleece and cut two pieces from a lining fabric, in this case plain black, at least an inch larger than the pattern piece on all sides. 
Lay  the bottom edge of your cuff {the edge you would put embellishment on} flush with one end of your lining fabric.
Turn so the seam is in. 
Pull the fleece up to reveal a small portion of your lining fabric to create a border on the bottom edge of the cuff. 
Cut off the excess lining fabric around the fleece. 
Create your loop, as described above in Miss Mak's way.
Place your two cuff pieces fleece-sides-together. Place your loop piece into place as shown.
Sew up two short sides. I recommend back-stitching over the loop for added strength.
Leaving the stocking body inside-out, line the cuff with the open end of the stocking and pin into place. 
Sew around the opening and be careful to keep the loop out of the way of your stitching.
Turn your stocking body right-side-out, fold the cuff down and you're done!
{If any of this still confusing, message me and I'll figure out a better way to explain or show how this all comes together. It truly is simple, just hard to explain.}

LinkWithin

Related Posts with Thumbnails