He tends his flock like a shepherd: He gathers the lambs in his arms and carries them close to his heart;
he gently leads those that have young
. {Isaiah 40:11}

Showing posts with label Favorite Things. Show all posts

11 September 2013

Finally! A Favorite!

So if you look to the right... yup, over there... by my picture... you'll see that I noted that I don't have favorites.
Well... that may not be completely true anymore.
My dad has told me on many occasions that
"You don't change as you get older, you just become more of who you already are."
Well apparently I'm getting old because I have finally been able to weed through the huge variety of design styles that I sincerely appreciate and come to THE one!
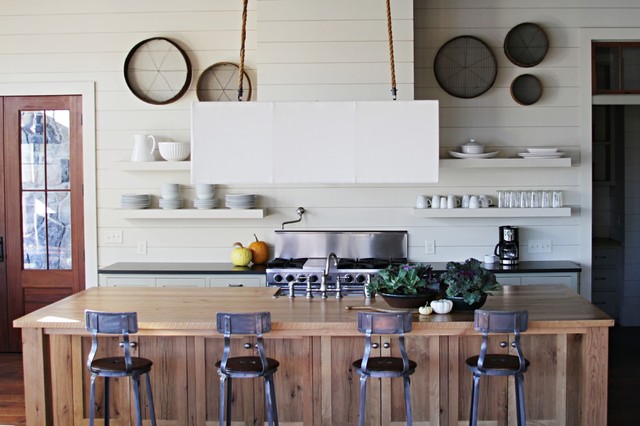
The Modern Farmhouse style is for me! 
I've always had a love for all the individual details that make up this down to earth and practical style.
Actually, its practicality and simplicity are what I love most!
I love that it is always so warm and inviting as if to say "Welcome. You're home now".
I love that it's uncomplicated and straight to the point.
This design style appears to put the most important of things first
...conversation and relationship...
the meal and those with whom you love to share it.
It facilitates experience and is not, in itself, an end but a means to it.
To put it simply, if it makes me wish I was slowly sipping a tall, shimmering glass of iced tea or snuggling with a steaming dark roast coffee... I'm home.
The design  and architecture is all meant to enhance life and not distract from it.
Yes, sometimes there's wallpaper and, yes, sometimes that wallpaper is gorgeous!
It never seems to take itself too seriously.
Occasionally it hints at the industrial...
and often reminds me of a 1930's school room.
Natural finishes are EVERY.WHERE.
...such as black steel roofs, stained wood doors, butcher block, galvanized steel, and leather. Oh my!
There is no shortage of beautifully rich wood floors...
and horizontal boards.
The white may seem boring to some but I adore the crisp, unadulterated ambiance.
It is the neutrality of it all that lends itself, as a host, to any moment you wish to celebrate.
It leaves loads of room for personal style!

I believe that beauty can easily be lost in the noise of most other design styles but in Modern Farmhouse Design it is center stage.
I could stare at these for days! 
So now I ask... what do you think?
Do you think it cold and institutional? Boring and lacking personality?
Maybe it's just right for you? Does it make you long for the rolling hills of Pennsylvania? The fertile valleys of Virginia? The unending plains of Oklahoma?
Oh, sweet Virginia, here I come!


house photo : kitchen island : kitchen island 2 : kitchen island 3entry : screen door : fire pit : dining table : "school room" : back porch : three green pictures :  Christmas Tree : door and shelves : green and teal kitchen : cow : black dresser bathroom : industrial kitchen : outdoor night view

03 January 2013

Clearning Nasal Congestion

First off... I don't know how the past week whizzed by!
I cannot believe how much more quickly time seems to pass with each kid we add to this family.
It's IN.SANE!
So anyway... after all this time I have so much set aside to share and yet I have found something to trump it all.
Something I think every parent of little ones, from newborns to toddlers and maybe older, should go purchase.
I mean NOW!
I mean, after I tell you what it is...

My sister gave it to me for Nugget this Christmas.
Thankfully, he has had some minor congestion at night due to our dry house (I get it too) and so I put it to use as soon as I got it home.
This baby works!
It's called NoseFrida the Snotsucker and yes, the picture is correct, you literally suck the boogers out of your kids' nose with this little baby. (Don't worry, there's a healthy sized filter between you and said boogers!)
It cleans way better than a the good ol' nasal aspirator and though the suction is stronger I feel as though the process is much gentler. I've used it every night since I got it. After dropping a couple of drop of saline water into Nugget's nose and massaging each side, I place the mouthpiece into my mouth, the other end at little guy's nose and begin to suck away.
So strange.
So gross (I couldn't do it with Hubs in the room, I was afraid to laugh and blow air in instead of out).
But so good. 

04 December 2012

Best Butternut Soup

I mean it.
I believe this is the best butternut recipe I've had to date.
Of course, it's from Martha.
The ingredients are simple.
It's just about as homemade as you can get.
And the flavor is perfect-warm-you-from-the-inside-out-gonna-have-to-share-with-a-friend-delish!
Whew!
Anyway... as usual, I've tinkered just a smidge but the original recipe is right here at Martha Stewart. The recipe below is with my changed but again, the original recipe is HERE.
Martha has this recipe at about an hour from start to finish.
What You'll Need:
4 bone-in, skin-on chicken thighs
1 medium butternut squash, about 2 1/2 lbs, peeled, seeded, and diced medium.
1 small onion, diced medium
2 T olive oil
salt and pepper
4 c chicken broth or water
1/4 t ground cumin
1 to 2 T fresh lemon juice
What To Do:
Heat oven to 425. In a roasting pan or jelly roll pan layer whole chicken thighs, diced squash, and onion, single layer. Sprinkle with salt, pepper, and oil,
Roast for 30 minutes, no turning necessary.
Let cool for a few minutes and remove chicken thighs to another plate for just a moment to cool further.
In a soup pot add 1/3 of the roasted squash and onion, 4 cups of broth, and 1/4 t cumin and begin to heat over medium heat.
Meanwhile, using a blender or food processor, puree the remaining 2/3 of the squash and add puree to the warming broth.
Add the 4 chicken thighs to the food processor or blender and pulse several times to break up.
Add chicken to the warming broth and heat through.
Right before serving, add lemon juice to taste and serve immediately or...
  as I did, place in a jars to cool and share. 
Hubs likes it! Kiddos like it! I love it!
I meant it! Try this! You won't regret it!
Happy Tuesday!


12 November 2012

Homemade Vapo Rub

I'd been looking for an alternative to store bought vapo rub which all seem to be petroleum (or mineral oil) based.
Why do I skip the petroleum based products? Do a Google search and you'll find plenty of reasons. If nothing else, I figure that when something is strong enough to run my car, it has no business being ingested via lip balm on my lips or sucked in through my biggest organ, my skin. I'm not here to convince anyone of anything. Skipping petroleum is just what we do in our home.
Anyway...

I found this little nugget over at Crunchy Betty and have made it three times already. I love this stuff. It was a big help during the nearly month long virus that overtook the whole family. It tamed the cough, allowed the kids to sleep, and, if nothing else, gave me a peace of mind knowing that there was at least a little something I could do to relieve their discomfort naturally.

The recipe is exactly as Crunchy Betty shares it but to save the trip I'll share it here... 

2 tsp beeswax
1/4 c olive oil (I've made it with grapeseed oil too)
25-35 drops of peppermint essential oil
15 drops of eucalptus oil
10-15 drops rosemary essential oil
{beeswax pellets can be found at most health stores as can the essential oils shown below}
Melt the beeswax and olive oil together in a double boiler.
Stir well with a whisk.

Continue whisking while adding essential oils.
*You may notice that the peppermint smells really strong while adding. Don't be tempted to skimp because of this. The strength of the smell fades as the mixture cools. 
Transfer to small lidded container (in this case a baby food jar)
Store in dry cool place for a year or more (It hasn't lasted that long in our house.)

I HIGHLY recommend giving this a shot in your home because of the number of times it's generally applied when we and our little ones are sick. 
Happy Monday!

16 October 2012

Photo Book for the Kids

Just a month ago I was at a wonderful friend's house in Michigan where Miss Mak and I saw a "brag book" full of pictures of the kids which was FOR the kids. Mak loved it and spent much of her time walking around with it.

I don't know if it was intentionally given to the kids or not but I know that the kids sure seemed to like it.
My guys like looking at pictures of themselves and people they know too so once I realized how cheaply I could get one together for our home it was a no-brainer for me.

$1.99 - I bought an inexpensive brag book from Target but I'm sure I could have found one at the dollar store if I had looked.
$4.81 - I printed 37 pictures from Costco at 13 cents a piece.
$6.80 - Total paid
Since I only had room for 36 pictures (37 including the cover picture) I was picky about the ones I included and was sure to pick a variety of people and things they know and recognize. Things like...
- Grandpanents
- Great Grandparents
- Our House
- Hubs and I (then and now)
- Individual pictures of us with the kids
- Pictures of the kids together at different ages...
And most importantly...the kids, especially Miss Mak (almost 3 years old), love looking at it!
Happy Tuesday!


20 May 2012

Amazing Fruit Salsa


I had this fruit salsa recipe for the first time about a year ago and loved it from the first bite.
My mother-in-law, the baker, brought up some up with her and I believe the recipe came to her from a woman in her home church in SouthWestern PA. 
It's pretty basic in it's ingredients and the results are, as I said, AMAZING! 

2 kiwi, peeled and diced
2 golden delicious apples, peeled, cored and diced
1 lb strawberries, diced
1 8 oz can pineapple chunks, undrained and cut into smaller pieces {or 1 c fresh pineapple}
3 Tbsp peach preserves
2 Tbsp white sugar {next time I make this I'm skipping the sugar to see how it goes}
1 Tbsp brown sugar {same here}
 
Mix all ingredients in a large bowl.  Cover and chill in refrigerator for at least 15 min.

C'est fini!  

This stuff is great with yogurt, granola, cinnamon chips, as fruit pizza, all on it's own...
MMM... SO GOOD! 

22 February 2012

PB&J Smoothie

We have taken a break from out standard tropical fruit, spinach, kefir, and yogurt smoothie because I made this once and the kids love it!
Yes, they actually ASK for it!
I found the idea at 100 Days of Real Food. Great site!
I vary from the original a bit but the basics are the same and I want to give credit to the originator of the idea...

My Version:   1/3 c yogurt, 1/3 c kefir or milk, 1/3 c peanut butter, 1 banana, 1 c frozen blueberries

Blend together and serve.


16 February 2012

A Night of Family Fun!

Hubs and I had a great night with the kids!
It was a normal night, we had just finished dinner and Hubs and I started the routine of clearing the table, rinsing the dishes, starting the bath for the kids and getting pjs out and ready. The plan was for only CJ to get a bath but Miss Mak wanted in so I figured I'd go ahead and give them the rest of the glow sticks that we used recently when our friend Big D came to visit.
This, once again, kept the two busy till the water got cold {about 45 minutes}
We got the monkeys out and dressed by the light of the dozen or so glow sticks in CJ's room.
Then the silliness began.
Hubs had bought CJ a drum when he was in Africa last month so we played while the kiddos danced and watched each other as they looked like streaks of light around the room.
Hubs had the great idea of catching this on camera and these were the results.


They pictures aren't great but I think they're a beautiful visual of the unhindered spirits of our kids. 


If you'd like to give this a shot, you need glow sticks {or a light source like a flash light}, a very dark room, and a camera with a manual setting that allows you to adjust the shutter speed. These were taken at all different lengths but most around the 5 second mark. You can either hold the camera still and move the lights or keep the stick still and move the camera.
When spelling things out, like we did below, be sure to stand behind the light source and place it between you and the camera. This means you'll need to spell things backwards. Begin writing or "painting" as soon as the shutter is opened and try to get it all done before the shutter closes. The faster you move the more subtle the lines. The longer the light source stays still the more vibrant it will be.
The best part about this is that anything goes so try it out and have fun!
I think the kid's did a much better job but Hubs and I couldn't help but get in on the it too...
 
 
I HIGHLY recommend a night like this with your kids!
Total cost: $1.00

LinkWithin

Related Posts with Thumbnails