He tends his flock like a shepherd: He gathers the lambs in his arms and carries them close to his heart;
he gently leads those that have young
. {Isaiah 40:11}

12 January 2011

{A.T.K. Philly Cheesesteaks}

 Philly Cheesesteaks
America's Test Kitchen Recipes that I tweaked just a little.  
2 lbs blade, sirloin, or round steak, trimmed
4 (6 inch) sub rolls split lengthwise
2 T vegetable oil {I used butter}
1 T brown sugar
2 onions chopped
{we added 1 green pepper, sliced and 6 oz mushrooms, sliced}
salt and pepper
6 slices America or Provolone Cheese

1. Slice your steak into 1 inch wide strips, lay on a large plate and place in freezer for 25 or so minutes. Then, using a sharp knife, slice meat as thin as possible.
2. Meanwhile, adjust an oven rack to the middle position and heat the oven to 400 degrees. Lightly toast the split rolls on a baking sheet, 5 to 10 minutes.
3. Heat the butter, brown sugar, and a pinch of salt and pepper in a 12 inch skillet on medium/medium-high until melted together. Add sliced onions, green peppers, and mushrooms. Cook until soft and caramelized. {Truly caramelizing takes a long time, I only let them sit for 15 or so minutes.}
4. Add the shaved meat to the skillet and cook about 5 minutes until beef is no longer pink.
5. Turn heat to low, shingle the slices of cheese over the meet and allow to melt, about 1 minute. Fold the melted cheese into the meat. Divide the meat and cheese evenly into the rolls and serve.

As usual, we ate this before pictures because we were so hungry and it smelled so good... so I snagged this picture from here.

11 January 2011

America's Test Kitchen

Amongst all the wonderful gifts I received this Christmas, I was given the America's Test Kitchen Family Cookbook by my mother-in-law. I had heard nothing but good things about this book and so I quickly sat down with pen and paper and noted all the recipes I wanted to try. I've had the book for about two weeks, I've made at least six of their recipes and haven't had a single bad thing yet.
Now in the spirit of true consumerism I will share recipes but only the ones I am able to find online {which I hope is every one of them}. Also, if I make variations of the recipes, I'll gladly share those because I want to remember my changes too.

So what's my point?
1. I got my hands on an excellent book that you should seriously consider buying if you like using simple fresh ingredients and want genuine usable tips for the kitchen that you can carry into all your cooking.
2. I wanted a place to document the recipes we've tried and how successful they were so we use them again {or don't} and I figured that if you were nervous to try a recipe, I'd share my successes and failures to hopefully help you out.

Have a wonderful day!

10 January 2011

The Stuff is Taking Over

I am far from being classified as a hoarder but I can tell you that I feel as overwhelmed as if we were. I think the holidays did more damage than I realized. There has been so much stuff coming in and next to nothing  has gone out. I cannot take this anymore!!! and have determined that I'm heading in a few days of solitary confinement with my home.
Send for help if I don't return soon.

*Update: I just began to tackle my crafting area downstairs only to find mouse "droppings" suspiciously close to my fabric stash!! Eww!! So I've decided to pack up all my crafting stuff neatly into plastic bins and store everything in the attic until I have need for it or mysteriously find room somewhere else in the house. 

06 January 2011

Homemade Liquid Laundry Soap

"I did it! I did it! I said that I would do it and indeed I did!"

Sorry, please pardon my over-excitement. I'm just glad to have finally run out of the store bought stuff thus I was "forced" to make my own! Why bother? For one, it's significantly less expensive! The Simple Dollar did a comparison and discovered that Tide With Bleach Alternative broke down to roughly .20 cents per load while this recipe rounded off at .02 cents per load. More importantly, for me, I like to know what goes into the products I use; especially when those products are up against my family's skin and potentially absorbed or breathed in by them all day.

I considered this to be simple. I did lots of research on how to do it. Originally I heard about it from a friend who heard about it on the Duggar family's website. Their recipe was a bit vague so I went online for some tutorials on youtube.com. YouTube did not disappoint. Though all of them have the same or very similar ingredients, the methods all vary a little. I specifically reviewed these three and adapted them al:
The Guy With The Iowa Wine
The Lady with The Great Soundtrack
The Not So Interesting But Informative Lady

Okay, enough with the chatting... here you go!

What You'll Need:
1 bar Fels Naptha {Any pure soap will do. I've even heard castille soap works.}
1 c washing soda {This is not the same as baking soda! See above picture.}
1/2 c borax
{I purchased all of the above in the laundry section at my local grocery store. You can usually find pure soap at the dollar store.}
6 c warm water
5 gallon bucket with lid {got ours from Home Depot}

What To Do:
Grate your bar of soap using a box grater. {I used Fels Naptha soap which was fairly soft so this took me less than five minutes to do.}

In a large soup pan mix all ingredients. {Be careful with the borax, it has been known to irritate breathing in it's powder form. I had no problems, I just avoided leaning over the box when I opened it or scooped it out. Consider using gloves while handling it.}Bring to a boil. You want a pot with tall sides because as this comes to a boil it foams a bit.
Turn the burner down to a simmer and simmer for 10 or so minutes. This just allows all ingredients to dissolve and mix. Stir periodically to incorporate.
Add about a gallon worth of warm/hot water to your 5 gallon bucket {easiest to do this in your bathtub}. Add soap mixture. Stir with a large spoon {I felt comfortable using a metal spoon from the kitchen to do this}. Fill the bucket the rest of the way with hot water and stir again.
Let sit in a warm spot for 24 hours. {I left my bucket in the tub for a day so that it was out of the way.}
After 24 hours you'll find that your liquid is a large batch of jello-like stuff. {I assumed the jello-y stuff was on the surface. Oh no, my friend, it goes all the way to the bottom of the bucket!}
Now comes the part where you have options....
Out of everything I read and watched I found no consistency in the concentration of usage. In other words, you can use 1/4 c of the congealed mix straight from your bucket or you can consider it a concentrate and dilute it by half with water. {We don't usually have heavily soiled clothing, even with the kids, so I opted to dilute it.}
To dilute it, the bucket "blob" needs to be stirred and broken up. A spoon just didn't cut it here so I dug my arm in and mixed it by hand. {As a person with sensitive skin I expected to irritate my skin but I had no reaction.} I broke all the large chunks down, by hand {maybe 5 minutes of mixing} then filled an old plastic liquid detergent bottle half-way with the soap, using a funnel, and filled it the rest of the way with hot water. I put the lid on the rest of the detergent left in the 5 gallon bucket and put it in the basement for when I need more.
This stuff does separate when it sits so I need to shake the bottle before dispensing it but I've been using 1/4 c per load and have haven't noticed a difference from my usual detergent. I'll keep you posted.


05 January 2011

{Maple Oatmeal Bread}

I have a nostalgia for homemade bread. My Oma always had a loaf on hand and gladly shared her recipe with my mom as well as her many other daughters and daughter-in-laws. I'm sure I'll share her recipe at some point; it's the most basic white or wheat bread recipe I've found. This recipe, however, happens to be my favorite bread recipe. It's also fairly simple. The coffee, maple syrup and butter in its dough make it so rich, robust and full-flavored. Hubs says it's like trying to describe a beer. There are hints of so many things that make it what it is that it's hard to describe. In other words, just make it and you'll see!

Maple Oatmeal Bread
{BH&G Cook Book Special Edition, "Eating for Life" section}
What You'll Need:
5 3/4 to 6 1/4 c all-purpose flour
2 packages {5 1/2 tsp} active dry yeast
1 1/2 c prepared coffee {the darker the coffee the stronger the flavor in the end}
1 c quick-cookie rolled oats
3/4 c pure maple syrup {i.e. no Aunt Jemima or Log Cabin!!}
1/3 c butter
2 t salt
2 eggs

What To Do:
In a large bowl, combine 2 cups of flour and the yeast. 
In a saucepan heat the coffee, oats, maple syrup, butter, and salt over medium low heat just until warm and butter is almost melted.
Add to flour mixture along with eggs. Beat with an electric mixer on low to medium speed for 30 seconds, scraping sides of bowl. Beat on high speed for 3 minutes.
Using a wooden spoon, stir in as much of the remaining flour as you can.
Turn dough out onto a lightly floured surface. Knead in enough of the remaining flour to make a moderately stiff dough that is smooth and elastic (3-5 minutes total). Shape into a ball. Place in a lightly greased bowl, turning once to grease surface of dough. Cover; let rise in a warm place until double in size, about 1 hour. 
Punch down dough. Turn out onto a floured surface; divide in half. Cover; let rest 10 minutes. Lightly grease two 9x5x3 inch loaf pans; set aside. 
Shape dough into 2 loaves by patting or rolling. (To shape, gently pat and pinch, tucking edges underneath. Or on a floured surface roll each dough half into a 12x8 rectangle. Roll up each rectangle, starting from a short side. Seal seems with fingertips.)Place shaped dough in prepared pans. Cover; let rise in a wam place until nearly doubled in size (30-45 mins).
Preheat oven to 375. 
Bake for 30 minutes or until bread sounds hollow when lightly tapped. If necessary, cover loosely with foil the last 10-15 minutes of baking to prevent over-browning. {This part is important! I've undercooked this bread and been left with a raw center because I didn't check it before cooling.}
Immediately remove bread from pans. Cool on wire racks.

04 January 2011

Free Drawer Organizer

I mean every word of that... especially the "cheap" part!
My utensil drawer has been driving me crazy. I can't seem to keep track of my measuring spoons and my can opener so I have to dig which usually results in a cut or defeat.
I saw a great tutorial using balsam wood pieces from the craft store to glue in dividers. Pure genius! BUT I didn't want to spend the money and ... okay, nevermind, I just didn't want to spend the money. So as we were piling up all the Christmas trash to be thrown out I looked at a large clothes box from Macy's and immediately thought to try making dividers out of it. Why not, it's free, right? So after 10 minutes, including pulling everything out of my drawer, making several folds in the thin cardboard, and reorganizing everything to fit... I got this!
 Yes, it's cheezy. Yes, it's a little "ghetto". And yes, it works! 
Yay for free!

03 January 2011

{Breakfast Granola}

I can't speak for anyone but myself here.
I indulged in a bit too much baking {as I'm sure you've assumed} and far too much eating of all the yummy treats.
Thus... we start off the new year with granola.

There are tons of recipes out there with dried fruits and other flavorings but I happen to really like the simplicity of this particular recipe. I pair it with, my favorite, Stony Fields French Vanilla or plain yogurt and a touch of maple syrup.
The way I've made it is with quick oats, as the original recipe calls for but I've had no problem using whole slow cooking oats. Maybe a little more to chew but the flavor is still good.


Breakfast Granola
{no idea where this recipe is from}
What You'll Need: 
1 c quick cooking Rolled Oats
1/2 c shredded coconut {sweetened or unsweetened work}
1/2 c slivered almonds
3 T vegetable oil
2 T honey

What To Do:
Preheat to 350. 
Mix all ingredients well, pour onto a baking pan with sides {I use a jelly roll pan} and bake for 10 minutes. Removed from oven, stir well, and bake for another 10 minutes or until browned. You'll want to watch the last few minutes carefully since it can burn if in too long. {My oven only requires it to bake for about 18 minutes.}Let cool and store in air tight container.
{As you can see, I quadrupled this recipe. I split it up on two pans for baking.}

31 December 2010

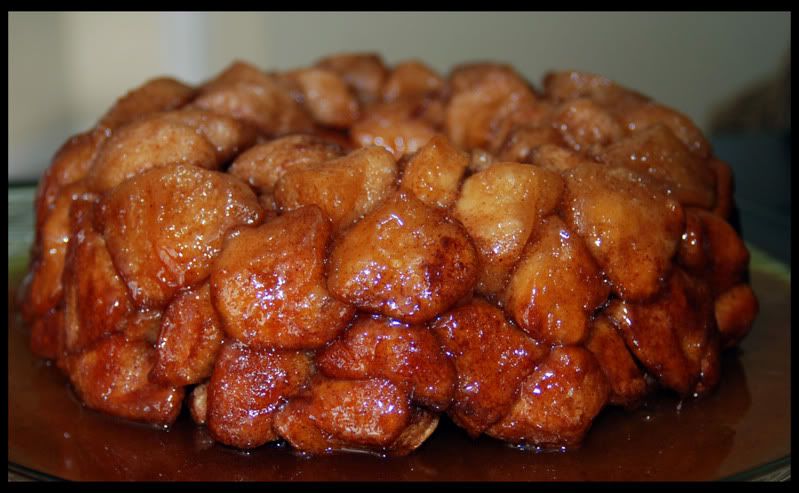
{Monkey Bread}

Finally! Just in time before everyone starts making resolutions to lose ten pounds... you might as well go out with a bang, right?


Monkey Bread

What You'll Need:
1/2 c granulated sugar
1 tsp cinnamon
2 cans of Pillsbury Grands Homestyle Refridgerated Biscuits
1 c firmly packed brown sugar
3/4 c melted butter

What To Do:
Mix granulated sugar and cinn in a resealable plastic bag.
Remove all 16 biscuits from the cans and cut each biscuits into quarters.
Place biscuit pieces into bag with cinnamon and shake until coated.
Assemble coated pieces into a lightly greased fluted pan.
Mix brown sugar and melted butter and pour over pieces.
Bake for 30 minutes or until golden brown.
Let cool in pan for 10 minutes then invert onto serving plate.

30 December 2010

{Puppy Chow}

My baking and "all things sweets" is coming to an end this week but I couldn't stop without sharing my all-time-favorite snack that I make tons of, especially at Christmas time...

Puppy Chow
{aka Muddy Buddies}
What You'll Need:
9 cups of Chex cereal {I prefer Rice Chex}
1 c semi-sweet chocolate chips
1/2 c peanut butter
1/4 c butter
1 tsp vanilla
1 1/2 c confectioners sugar

What To Do:
Measure out Chex cereal into a large bowl and set aside. 
Measure confectioners sugar and place in a gallon size resealable bag.
Mix chocolate, peanut butter, and butter into microwave safe bowl. Heat for 30 seconds. Stir and repeat until everything is melted and well mixed. Add vanilla. 
Pour chocolate mix over Chex cereal and stir until all cereal is well coated. I use my hands for this just cause. 
Pour cereal into plastic bag. Seal bag and shake until all cereal is coated with sugar. 
Eat. Eat. Eat. 

29 December 2010

{White Chocolate-Raspberry Cheesecake Bars}... WITH Oreos!

 Yes, a little more baking. I know.
...but did you read the name of this recipe?
Need I say more?
 White Chocolate-Raspberry Cheesecake Bars
{avec Oreos}
12 Oreo cookies, finely crushed
2 T melted butter
3 oz white chocolate squares, divided
16 oz cream cheese, softened
1/2 c sugar
1 t vanilla
2 eggs
1/4 c raspberry preserves

Heat oven to 350. 
Mix Oreos and butter and press into the bottom of a square baking dish. 
Beat cream cheese, sugar and vanilla in a bowl. Melt 2 oz of the white chocolate and mix into the cream cheese mixture. Add one egg at time to the mix until blended. Pour over crust and bake for 25 minutes or until center is almost set. Let cool for 5 minutes. Pour preserves over top and spread evenly. Melt remaining chocolate and drizzle over top. Cool completely and refrigerate for 4 hours. Cut into bars to serve. 


28 December 2010

{Thumbprint Cookies}

 Thumbprint Cookies
makes 4-5 dozen

What You'll Need: 
2 c butter {yup, that's 4 whole sticks}
1 c sugar
6 eggs; separated
3 tsp vanilla
1 1/2 t salt
4 1/2 c flour
1 lb of crushed walnuts {optional}
filling of choice {jam, jelly, pie filling}

What To Do:
Preheat to 350.
Beat butter and sugar until fluffy. Lightly whip 6 eggs yolks and add to butter mixture along with vanilla and salt. Beat well. Gradually add flour until all 4 1/2 cups are in.
Using a fork, lightly beat egg whites until they start to get frothy.
Dip dough balls into egg whites and then into crushed nuts and place 1-2" apart on a baking sheet. Press your thumb into the center of each dough ball to create a divet for your filling. {I prefer raspberry jam but I've heard cherry pie filling is good too.}
Bake 15 minutes.

27 December 2010

{Homemade Marshmallows}

Why, you wonder, would I make my own marshmallows? Easy. Because I can!
Okay, for real, I like to know what's in the food I eat and wondered how hard it was. The reality is, for as often as I eat marshmallows, it wasn't hard. The process was quick and easy but kind of messy.
My conclusions, I'll gladly buy a bag in a pinch but, if I have enough time to plan ahead, I'll probably make my own.
** I'm so sorry... I failed to mention the recipe I used... Alton Brown lent the world this one.

And these go really well with Martha Stewart's hot chocolate mix
I read the back of the Swiss Miss container the other night and was a little irked by the fact that the second ingredient listed on the package was corn syrup and cocoa was fourth along the list followed shortly after by "artificial flavoring". Odd.
So we said goodbye to our old standby, bought a few air-tight glass containers from the dollar store and are now enjoying the rich tasting cocoa we get with just three ingredients... sugar, cocoa and a pinch of salt. Beautiful!

24 December 2010

Merry Christmas

I pray you have a blessed holiday weekend with lots of good food, sweet family moments, and at least a little relaxation. 


Merry Christmas!

23 December 2010

{Peanut Butter Munchies}

These need no introduction... I mean, look at them!
Peanut Butter Munchies
makes about 3 dozen

What You'll Need: 
1 1/2 c all purpose flour
1/2 c unsweetened cocoa powder
1/2 t baking soda
1/2 c butter
1/2 c granulated sugar
1/2 c packed brown sugar
1/4 c peanut butter
1 egg
1 T milk
1 t vanilla
3/4 sifted powdered sugar
1/2 c peanut butter
2 T granulated sugar

What To Do:
Preheat oven to 350.
In a medium mixing bowl stir together flour, cocoa, and baking soda. Set aside.
In a large mixing bowl, beat together butter, the 1/2 c granulated sugar, brown sugar and 1/4 c peanut butter with electric mixer. Add egg, milk and vanilla an dbeat well. Beat in as much of the dry ingredients as you can with the mixer. Stir in remaining dry ingredients by hand with wooden spoon. Form chocolate dough into 32 large balls and set aside.
For the peanut butter filling, in a medium mixing bowl combie powdered sugar and the remaining 1/2 c peanut butter until smooth. Shape mixture into 32 small balls.
On a work surgace, slightly flatten a chocolate dough ball and top with a peanut butter ball. Shape the chocolate dough around the filling to completely cover the filling. Roll the dough into a ball. Repeat with remaining chocolate dough and peanut butter filling balls.
Place balls 2 inches apart on an ungreased cookies sheet. Lightly flatten them with the bottom of a glass dipped in the 2 tbsp of sugar. {Honestly, I skipped this part.}
Bake cookies for 8 minutes or until they are set and the surface is slightly cracked. Let cookies stand on sheet for 1 minutes then transfer to wire rack to finish cooling. 


22 December 2010

{Forgotten Cookies}

 Forgotten Cookies
{as if there could be such a thing}
makes 2 dozen

What You'll Need: 
2 egg whites, room temperature
3/4 c granulated sugar
1 1/2 c chocolate chips

What To Do:
Preheat oven to 350. 
Beat egg whites and sugar until stiff peaks form. Do not under whip. {We started with a hand mixer but it wasn't working so I moved the whites to a stand mixer on high and it did the job.} Fold in chocolate chips. 
Line a cookie sheet with parchment paper or use a silicone baking sheet. Drop mixture by tablespoon-fulls onto lined cookie sheet, spacing cookies 2 inches apart. Place cookie sheet in oven and turn oven off. Leave cookies in oven (without opening the oven door!) until oven has completely cooled. {I made these late at night and let them sit in the oven overnight.}
 My aunt makes a plethora of cookies each year and this is one recipe she makes every year. 
If you like meringues, you'll love these.

21 December 2010

{Peanut Butter Blossoms}


 Peanut Butter Blossoms {2 Ways}
makes about 3 dozen
What You'll Need:
1/2 c sugar                                            
1/2 c brown sugar
1/2 c butter or shortening
1 egg
2 T milk
1 t vanilla extract
1/2 c peanut butter {all natural and regular both work}
1 3/4 c all purpose flour
1 t baking soda
1/2 t salt
1/4 c sugar {optional}
Hershey Kisses or Reese's Peanut Butter Mini Cups

What To Do:
Cream butter and sugars. Add egg, milk and vanilla. Mix in peanut butter. Mix dry ingredients and add to the creamed mixture. Roll dough into 1 1/2" balls and then roll balls in granulated sugar {optional} to coat.
For Hershey Kiss Blossoms.... place balls onto ungreased cookie sheet  and bake for 8 minutes. {You can use this time to unwrap Hershey Kisses.} Remove from oven and push a single Kiss into the center of each cookie. Return to the oven for another 3 minutes.

For Reese's Cup Blossoms... place rolled balls into tassi pan and bake for 10 minutes. {You can use this time to unwrap Reese's Cups}Remove from oven and immediately push a single Reese's Cup into the center of each cookie. Allow cookies to remain in pan for a few minutes to set. I use a butter knife to gently lever them out.  

My mother-in-law, the baker, shared these beauties with me. 
They're delicious and thankfully quick and easy... my favorite! 

20 December 2010

Lesson Learned


So I put a good bit of effort into making yarn balls for Miss Mak's room for Christmas. I had them hanging all around her room on a strand of lights. We have forced air heating in our home {a seemingly unrelated point yet completely relevant}. Forced air equals dry air in our home so we started up the humidifiers in the kids' rooms. The next morning I found these...
We made 16 yarn balls... now we have four and Mak's room decorations look like this...

Lesson learned.


15 December 2010

Can I Just Tell You...

I'm completely and totally smitten with my little family!


And to think there's another on the way!

14 December 2010

It's Almost Here and It's Gonna be Good!

So, for the sake of explanation, I have been busy planning a ladies' night for out church that is finally happening this Friday. One might think it's a bit insane for a mom of two tiny people, with another on the way and very little time to spare, to take on something like this. The reality is, it totally is! But in a great and wonderful way!
Our evening is meant to be pure relaxation for the women who attend. A menu of Chicken with Wine, french cut green beans with roasted peppers and onion, Martha Stewart's "Luxurious Mashed Potatoes, and a salad with pears and candied pecans is being prepared by a handful of volunteers. This night also has crafts. Not your run-of-the-mill sequins, glitter and Elmer's glue kind. No! I have just finished making kits for button necklaces {courtesy o' Martha} and lima bean wreaths like the ones I posted just a few days ago. All supplies are being purchased and paid for so that our lady friends can show up and just go with the flow. No pressure, no decisions. Just sit back and enjoy.
Now, originally, I thought thirty women was a stretch. I figured that we'd get twenty-eight or so, plan for thirty and be "good-to-go". This still sounded good on our deadline of last Wednesday when we had twenty-four people signed up. Since the organizers figured we could fill a few more seats we made one last announcement at church this Sunday and... oh boy!... added another twenty people to the list with a handful of "maybes" just hanging out there. oh.my.goodness!
My first reaction... complete and total panic.
My second response... pure awe at the power of the living God who has not only continued to give me patience and peace exactly when I have needed it but has provided friends from everywhere who want to help and have taken on huge things to make this night happen.
One of the most beautiful things about this coming gathering is that it isn't intended for just believers. This is an opportunity for woman of all kinds/backgrounds/etc. to join and just be women. Many of the women who are coming are friends of those who attend the church and some are unbelievers. What a blessing! I think that's the part that, I feel,  puts even more pressure on us to make this evening spectacular but the reality is I'm way beyond my realm here. I'm outside my comfort zone and yet I am enjoying the ride because God has done nothing but show how He has it all under control. Down to the smallest excessive detail.
If you think to, please pray for the ladies who will be joining us that evening who don't know Him. Pray that their hearts will be open and that Christ's love will flow from those who do know Him so that all may see and be drawn to the One True God.

As a side-note: I miss sitting down and sharing with you. I miss hearing from you. I cannot wait for things to calm down so I can sit back and relax a little; do a little crafting and enjoy sharing the much simpler moments and things in my life like the homemade laundry detergent I will soon be needing. Oh goodie!

13 December 2010

I've been so overwhelmed lately by my schedule. It's my own fault. I've signed myself up for a lot. I hesitate to say that I've signed myself up for "too much" because I have the full support of sweet hubs, yes, the very same man who encourages me to to keep posting on my blog also encourages me to keep on keepin' on {even when it means his dinners are grilled cheese or rotisserie chicken from the store and that he runs out of clean undershirts}.
By God's grace, alone, I have been able to maintain my patience far beyond what I ever have before. When I'm scrambling around and CJ wants to sit and chat about all the Disney characters on the back of a DVD he found, I have been able, for the most part, to take a few minutes to sit down with him and discuss things. I can tell you that even when I'm not busy and just a wife and mommy, it can be hard to make time for that. Miss Mak has proven to be a super-easy baby {barring hunger or tiredness} and hasn't seemed to notice all the running around.
BUT.... I am tired!
Scratch that. I.am.exhausted.
I am constantly asking myself if I am in the Lord's will because this kind of tired just doesn't seem right. And yet, things are falling together "like butta". Encouragement from those around me comes exactly when it's needed. Enthusiastic and optimistic friends are nearby when I start to doubt. Just when I think the house couldn't get any messier, Hubs has cleaned the clutter and filled the dishwasher, CJ has picked up his toys, or I have found time to vacuum which ALWAYS needs to be done. Just when I start to feel guilty because I haven't spent as much time with my kids as I usually do, Mak pulls up to the couch and reaches for me to snuggle for a few minutes, then happily crawls away to play contentedly on her own. Just when I think I have come to the end of myself, He gently reminds me that I have been treading water in the deep end in vain because He's been in control the whole time.
Why is that so hard to remember? 

LinkWithin

Related Posts with Thumbnails