He tends his flock like a shepherd: He gathers the lambs in his arms and carries them close to his heart;
he gently leads those that have young
. {Isaiah 40:11}

Showing posts with label Our House. Show all posts

16 July 2013

Craft Room Update: Painting Laminate


The craft room became our junk room/drop and run room/avoid at all cost room over the past months.
The idea of sitting down to sew something has been laughable since Baby J was born.
I thought for sure I wouldn't dare let our future homeschool room turn into a dump pile and yet....
Every time I passed this room I died a little on the inside.
And then we got a piano.
I had no choice but to move some things around and so our computer, the one I use daily, ended up needing a new home and so classroom/craft room was now also our home office.
I was thankful for the push to get things done and so my first stop was at good ol' Home Depot for paint and primer. 
Several months ago I found this great hutch at my Salvation Army for a whopping $35.
It's hardwood and surprisingly heavy.
I knew as soon as I saw it in the store that I would be painting it but summoning the motivation was tough.
All those nooks and cranies!
And on the left of the hutch you can see the disassembled laminate bookcase I nabbed from my mom who was pitching it.

Painting Laminate:
After a light sanding, two coats of Bullseye 1-2-3 primer, and three to four coats of gloss trim paint, these two pieces were ready for storing.
The room is still unfinished but it's functional. And that's probably how it will remain until another wave of motivation comes along.

I wanted to note....
The laminate bookshelf I painted was falling apart. I think it was mostly because of the flimsy carboard backing that came with the shelf. Using the old back piece as a template, Hubs went out and bought 1/4" underlayment from HD, had it cut to size, and we nailed it in place. The shelves were sturdy like new again. That little fix was well worth NOT buying a whole new book shelf!
All that is to say... keep your eye out for used furniture at tag sales, thrift stores, and in your own home. It almost always costs less than buying new and has always served us well.

The hutch to the left was a thrift store find for $35, the wood shelf on the desk to the right was a tag sale find for $5, the dining table/desk in the middle (which I'm considering painting Fire Engine Red) was a craigslist purchase for $50, and the bookshelf was free from my mom who was throwing it out. Not too shabby if I do say so myself.

01 March 2013

Kitchen Wall

Hi There! 
I'm not sure how long you've been dropping in for but I'm so glad you have! 
Just thought you should know
So... Yesterday I finally got a teensy bit of motivation to do something I've been intending to do for months now. 
First of all, do you remember this wall?
It started out a year and a half ago looking quaint... and wallpaper... and bordered... and blue.
Cute but not for us.
So we took it off.
 I should say we TRIED to take it off.
After a good long stretch I gave up we covered it.
 And then I painted it with chalkboard paint with the intention of "doing something" up there eventually.
Months passed and I finally got an itch to git'r done.
 First I conditioned it... 

 And then I got a little out of control!
I'm not gonna lie... as it would clearly be an attempt in futility...beautiful chalkboard art is NOT my forte.
And I may have gone a little overboard.
This will take some practice.
But for now, I'm gonna get used to it and see how it goes.
 Any suggestions?
Have a blessed weekend!

15 January 2013

Headboard Done. Here's Some Tips.

I don't know if you happened to notice our headboard-less bed back in this post but after over a year of pillows disappearing over the edge and the morning sun waking me a bit too early in the summer we decided it was time to grow up and get a headboard. I looked on craigslist.org for several months with a couple of prospects but no real winners so once I found this post by Sarah M. Dorsey Designs I gave in and did it myself.
 I was sort of impatient in getting this project done since I had been looking so long with no success so I didn't figure out buttons for the tufting. I'm going to let this simmer for a while until I decide what I want to do anyway.
Since I'm not giving any tutorial on this I figured I would share this with you just so I could point out how simple it was and fast. I put it together in one Sunday afternoon. I'd say it took about 3 hours total. I can't speak for the supplies Sarah used on hers but I can speak to how I made this project less expensive...

WOOD: Sarah uses a larger piece of wood for her headboard that I did. I have a queen sized guest bed I'd like to create another headboard for so I decided to risk being short on wood and had the handy man at Home Depot cut a piece of 1/2" plywood in half for me so that I could squeeze two headboards out of one piece of ply. The final dimensions for our king size headboard were 24"x77". (If you decide to do this on your own, don't use anyone else's measurements. Measure your bed because they can vary.) The board pictured above drops only 2-3 inches below the mattress line but thanks to the sidearms you can't tell. 

FOAM: If you've looked, foam can be crazy expensive. Some of the foam I saw was $60 a yard!!! I was not even close to considering spending that so I went to target and bought myself twin sized egg-crate mattress pad for $13. It wasn't thick enough to get a deep Victorian looking tuft which is good because that's not what I wanted. (

FABRIC: drop cloth. I think it was between $10-$20 at Home Depot. It was just what I needed and the color I wanted.

And that's that.
Happy Tuesday!

16 October 2012

Photo Book for the Kids

Just a month ago I was at a wonderful friend's house in Michigan where Miss Mak and I saw a "brag book" full of pictures of the kids which was FOR the kids. Mak loved it and spent much of her time walking around with it.

I don't know if it was intentionally given to the kids or not but I know that the kids sure seemed to like it.
My guys like looking at pictures of themselves and people they know too so once I realized how cheaply I could get one together for our home it was a no-brainer for me.

$1.99 - I bought an inexpensive brag book from Target but I'm sure I could have found one at the dollar store if I had looked.
$4.81 - I printed 37 pictures from Costco at 13 cents a piece.
$6.80 - Total paid
Since I only had room for 36 pictures (37 including the cover picture) I was picky about the ones I included and was sure to pick a variety of people and things they know and recognize. Things like...
- Grandpanents
- Great Grandparents
- Our House
- Hubs and I (then and now)
- Individual pictures of us with the kids
- Pictures of the kids together at different ages...
And most importantly...the kids, especially Miss Mak (almost 3 years old), love looking at it!
Happy Tuesday!


04 October 2012

Schoolwork on the Mind Without Losing Yours

Problem... Too much to remember...
Solution... 

I have no idea if I mentioned to you all or not that our family has officially taken the first step into homeschooling.
CJ still attends preschool two days at a Christian School, mostly for the friendships and time to himself without his sisters and me.
We also started him in a one day a week program called Classical Conversations (CC). So far, we LOVE it! We've opted to follow the Classical Model with our homeschooling and CC fits right in.
I won't go into all the reasons we've chose the Classical Model here but would be glad to share if you ever want to know.

Anyway... the main work for the elementary ages in the Classical Model is pure memorization. I mean in ALL subjects be it math, science, history, Latin... it's ALL memorization.
That means we have a lot to keep track of over the 24 weeks of material we have to learn and without it front and center I struggled to remember the work.

I headed to our local Christmas Tree Shop (Michaels and Walmart should carry them too) and grabbed a plastic poster frame for about $6.
I framed a piece of fabric I had lying around, not ironed as you can may have noticed...
and, using a dry erase marker, wrote this week's memory work.

We put it up in our dining room across from where Hubs and I sit so we remember to quiz CJ regularly.
Hubs and I agree that this was one of the smartest things we could have done to keep schoolwork on the front burner in our busy home.


21 September 2012

Problem(s) Solved!

I know that you're just dying to know what's happening with our yard right now <dripping with sarcasm>...
so I will update you promptly on a fairly dramatic change that took about an hour to accomplish and quickly got "out of hand".
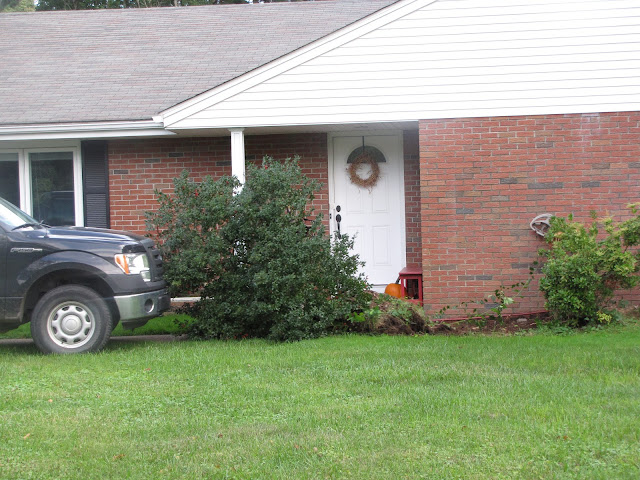
Hubs and I have been bothered for a while by the holly bush that seemed to be closing in on our front door. Little bit little, over the past year, we lost our view of the front yard. 

So we chained it to the truck and promptly did away with the problem...
So we thought.
After staring at what was left for a while we decided that the next shrub over looked a bit sad and decided to be done with it as well.
(I'm sure you see where this is going.)
 
We sat back and admired the work only to realize we didn't really like the next remaining bushes either...
and... well you get the idea... 
Ahhh... 
A clean slate. 

Now... what to plant?
Happy Weekend!

13 July 2012

Basement Bathroom Progress

Nothing too fancy in the bathroom here, I just desperately wanted to be rid of the floral paper on the walls and to tone down the checkered floor a smidge. We're still working on this one but so far... 
Befores:
 
During (Round One): 
 

During (Second Wind):

And that's that!
Have a wonderful weekend!

12 July 2012

Playroom Progress

Another round of craziness while trying to get projects done around the house. We have three weekends worth of guests coming up soon and have been working hard to get the basement "visitor ready". Here's how it's coming along, with some befores and afters.

Play Room Before:
Before we bought the house... isn't it lovely? But of course, we have kids so once we got out hands on it it looked a little more like this...
Play Room During: 
Play Room Afters: 
 
We created some stations to make clean up easier for the kids.
Dress up, which I hope to "pretty up" a little with a light and a better mirror... 
Kitchen...

Hubs built this as one of our Christmas present for the kids.
The general "toy and tidbit" section...
and my favorite part... the adult section where we can safely watch the children and drink hot coffee at the same time. By the way... all the seating was F.R.E.E.! What, What!
If you'll notice, on the right hand side, behing the chair, there is curtain. This is a temporary hold because at somepoint this will go from a wasted nook to a reading corner for the kiddos. {Baby steps. Baby steps. Baby steps.}
Tomorrow I'll share the bathroom update...
Have a wonderful evening!

LinkWithin

Related Posts with Thumbnails