He tends his flock like a shepherd: He gathers the lambs in his arms and carries them close to his heart;
he gently leads those that have young
. {Isaiah 40:11}

Showing posts with label Baking. Show all posts

30 October 2013

No Eggs? No Problem!

Since we've been changing our eating habits I've begun to have some random ingredients around the house. I'll be honest, the bag of chia seeds I purchased sat in the cabinet untouched for several months before I found a purpose.
And then I ran out of eggs. 
Thanks to the good ol' interwebs I found out that that bag of odd black seeds would work as a handy substitute. 
You'll Need:
1 T chia seeds
3 T water

To Do:
Using a coffee or spice grinder (I supposed a morter and pestel would work as well), grind the seeds to a fine powder. 
In a small bowl, combine the seed powder and water and stir with a fork until well mixed.
Let sit for 10 or so minutes until thickened to a nice eggy consistency.
Use as a single egg replacement and duplicate as needed. 


See, maybe oddball ingredients aren't so bad to have on hand after all! 


27 March 2013

Homemade Saltines

I mentioned that I made these a few weeks ago when the kids were sick and I wasn't about to run four kids out the door so I found this recipe at Restless Chipotle.
For ease I copied it word for word here...
--------------------------------------------------------------------------------------------------------------
       4 cups flour (all purpose, bread, whole wheat or a mixture- be creative
       1 Tablespoon Baking Powder
       1/4 cup unsalted butter
       1 1/3 cup whole milk
       Salt crystals for sprinkling
       1 egg yolk + 1 tablespoon water OR 1 egg white + 1 tablespoon water, beaten together for egg wash.
  1. Mix together the flour, baking powder, and butter .
  2. If you are adding seasonings mix those in with the dry ingredients.
  3. Cut butter into flour mixture until it forms coarse crumbs.
  4. Add the milk and knead to form a ball.
  5. Divide in 4 parts and roll out paper thin on a floured surface. The thinner they are the crisper they will be.
  6. Cut the dough into squares (a pizza wheel works great for that!)
  7. Place on an ungreased cookie sheet and prick all over with a fork.
  8. Brush with the egg wash and sprinkle with salt (or cracked pepper ..or..)
  9. Bake at 325 until golden brown..about 15- 20 minutes. (check after 10 minutes)
Notes:
The yield of this recipe is largely dependent on how you cut the crackers. The nutrition information is based on cutting them into 36 large crackers.
---------------------------------------------------------------------------------------------------------------
I switched out a portion of the white flour for home ground wheat flour.
Another tip is to roll the dough as thin as you are able. The thinner the better and the more authentic the taste.
These were really easy, rather quick, and tasty. I don't think they replace regular saltines for flavor because, let's be honest, there's nothing like a saltine... but it's a really good alternative if you're trying to do more homemade or just don't want to run to the store and they're so buttery you can't eat just one. I know I sure didn't!


04 September 2012

Homemade Nutter Butter Cookies

I made these the other day. You should too. 
Find the recipe at Cookies and Cups and be prepared for tastiness! 
No skimping on sugar here but worth it for a special treat. 
They definitely spread so stick with the 1" ball otherwise you're going to end up with ginormous cookies. (Yes, there are worse things that can happen than huge, yummy cookies.)

11 May 2012

Question...

Why are you and I not sitting together, right now, with a cup of coffee and a plateful of these?...
or these...
or these...
 Excellent question, is it not?!

Well...
even if we can't be together today, we can still bake, right!
Or maybe I'll just take a nap...
Either way... HAPPY WEEKEND, friend!

20 February 2012

King Cake

 
Remember when we had some visitors?
Well she just so happens to be a bonafide Louisiana girl!
...and while she was here, she taught me the beauty of the King Cake... which basically means she showed me the recipe she uses and we made one together.
If you're unfamiliar with a King cake you can find plenty of information online about it's long and rich history and how it relates to Mardi Gras {which is tomorrow}.

Flavor-wise it's a sweet yeast bread with a cinnamon and butter center and a sweet sugar topping. It's somewhat moist and reminds me of a cinnamon roll. In other words, it's yummy!
I'm planning to make one tonight for Hubs to try. He wasn't here when we made it and since he is a true northerner I'm not sure he even knows what a king cake is!
Wanna try?

This recipe makes two cakes and does require almost 3 hours of rising and 30 minutes of baking. 

What You'll Need: 
Pastry: 1 c milk, 1/4 c butter, 2 (.25 oz) package dry yeast {4 1/2 t}, 2/3 c warm water, 1/2 c white sugar {divided}, 2 eggs, 1 1/2 t salt, 1/2 t freshly grated nutmeg, 5 1/2 c all purpose flour

Filling: 1 c packed brown sugar, 1 T ground cinnamon, 2//3 c chopped pecans (optional), 1/2 c all purpose flour, 1/2 c raisins (optional), 1/2 c melted butter, 8 oz cream cheese (optional)

Frosting: 1 c confectioners sugar, 1 T water or milk

What To Do: 
Scald milk {heat to about 180, just below a boil}, remove from heat and stir in 1/4 cup of butter. Allow mixture to cool to room temperature. 
 In a large bowl, dissolve yeast in the warm water with 1 tablespoon of the white sugar. Let stand until creamy, about 10 minutes.
 
 When yeast mixture is bubbling, add the cooled milk mixture. Whisk in the eggs. Stir in the remaining white sugar, salt and nutmeg. Beat the flour into the milk/egg mixture 1 cup at a time. 
 
When the dough has pulled together, turn it out onto a lightly floured surface and knead until smooth and elastic, about 8 to 10 minutes. {I ended up adding over half a cup more to get the texture I needed.}Lightly oil a large bowl, place the dough in the bowl and turn to coat with oil. Cover with a damp cloth or plastic wrap and let rise in a warm place until doubled in volume, about 2 hours. When risen, punch down and divide dough in half. 
Sorry... no pictures...
Preheat oven to 375 degrees F (190 degrees C). Grease 2 cookie sheets or line with parchment paper.  

To Make Filling: Combine the brown sugar, ground cinnamon, chopped pecans, 1/2 cup flour and 1/2 cup raisins. Pour 1/2 cup melted butter over the cinnamon mixture and mix until crumbly.
OR
Mix brown sugar, cinnamon, flour, butter and cream cheese. {We tried both fillings and I preferred the one with cream cheese. It was moist and sweet!}

Roll dough halves out into large rectangles (approximately 10x16 inches or so). Sprinkle the filling evenly over the dough and roll up each half tightly like a jelly roll, beginning at the wide side. Bring the ends of each roll together to form 2 oval shaped rings. Place each ring on a prepared cookie sheet. With scissors make cuts 1/3 of the way through the rings at 1 inch intervals. Let rise in a warm spot until doubled in size, about 45 minutes.  
 
Bake in a preheated {375 degree}oven for 30 minutes. If you are familiar with putting a trinket in the cake {in Europe it's often a bean} now's the time to add it by pushing it into the bottom of the cake. Frost while warm with the confectioners' sugar blended with 1 to 2 tablespoons of water or milk. 
Top with yellow, green and purple sugar. 
 
Enjoy!  

10 January 2012

Rainbow Cake

No... this is not an original idea. 
Yes... it's super easy!
Yes... I'll be making it again! 
I found a recipe on MarthaStewart.com.
I was going for the same look as she had but didn't have the time or energy to make it from scratch like she did and I was not comfortable with putting in the amount of food coloring required to get the vibrancy of colors that she did.
So I made it work with what I had and here's what I ended up with...

I used two boxes of white cake mix and two containers of white frosting.

"Gasp! You mean this isn't made from scratch with your own freshly milled grain?!"

Nope.
I work hard to feed my family healthy, nutritional meals regularly so I don't mind a processed splurge every so often. Otherwise, what's the fun?

Anyway...
two boxes of white cake mix
two containers of white frosting {one of ours was FunFetti}
food coloring
as many cake pans as you can gather
butter and flour/PAM/coconut oil or some other means of greasing your pan

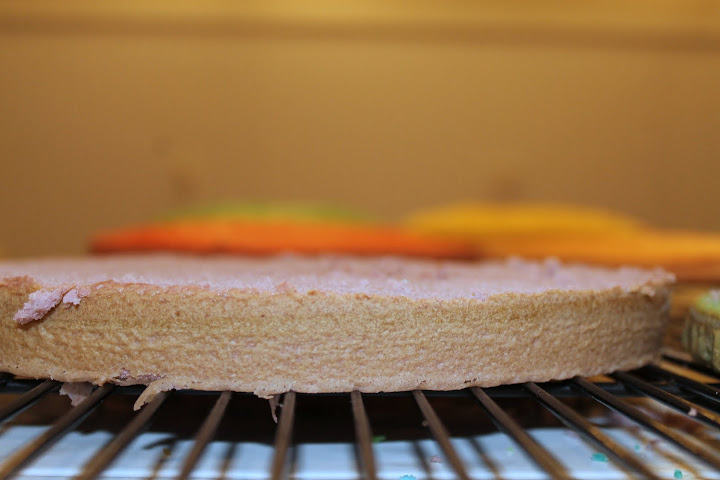
I made up both boxes of cake mix and divided the batter evenly into six bowls {approx 2 cups of batter for each bowl}. One by one, I used the food coloring to dye the batter red, orange {red and yellow}, yellow, green, blue, and purple {red and blue}.
The colors didn't look quite right, especially the red and orange but they all intensified during baking. The red was more of a dark pink, the purple was a lavendar, and the yellow looked nearly white before baking.
Grease the pans well... I used butter and flour... and bake each pan for 15 minutes. Test with a knife/toothpick/spaghetti noodle for doneness.
Once done, let cool for 10 minutes in the pan, then turn out onto a cooling rack and let it cool for another fifteen or more minutes.
Once FULLY COOL, use a long knife, such as a bread knife to cup the tops of the cake level.
{We gave the tops to Mak to eat at her leisure.  What can I say, it was her birthday!}

You may notice that the outside of your cake is slightly browned like mine...
Once the cake is frosted, you will not see these edges, just the great colors you've mixed!
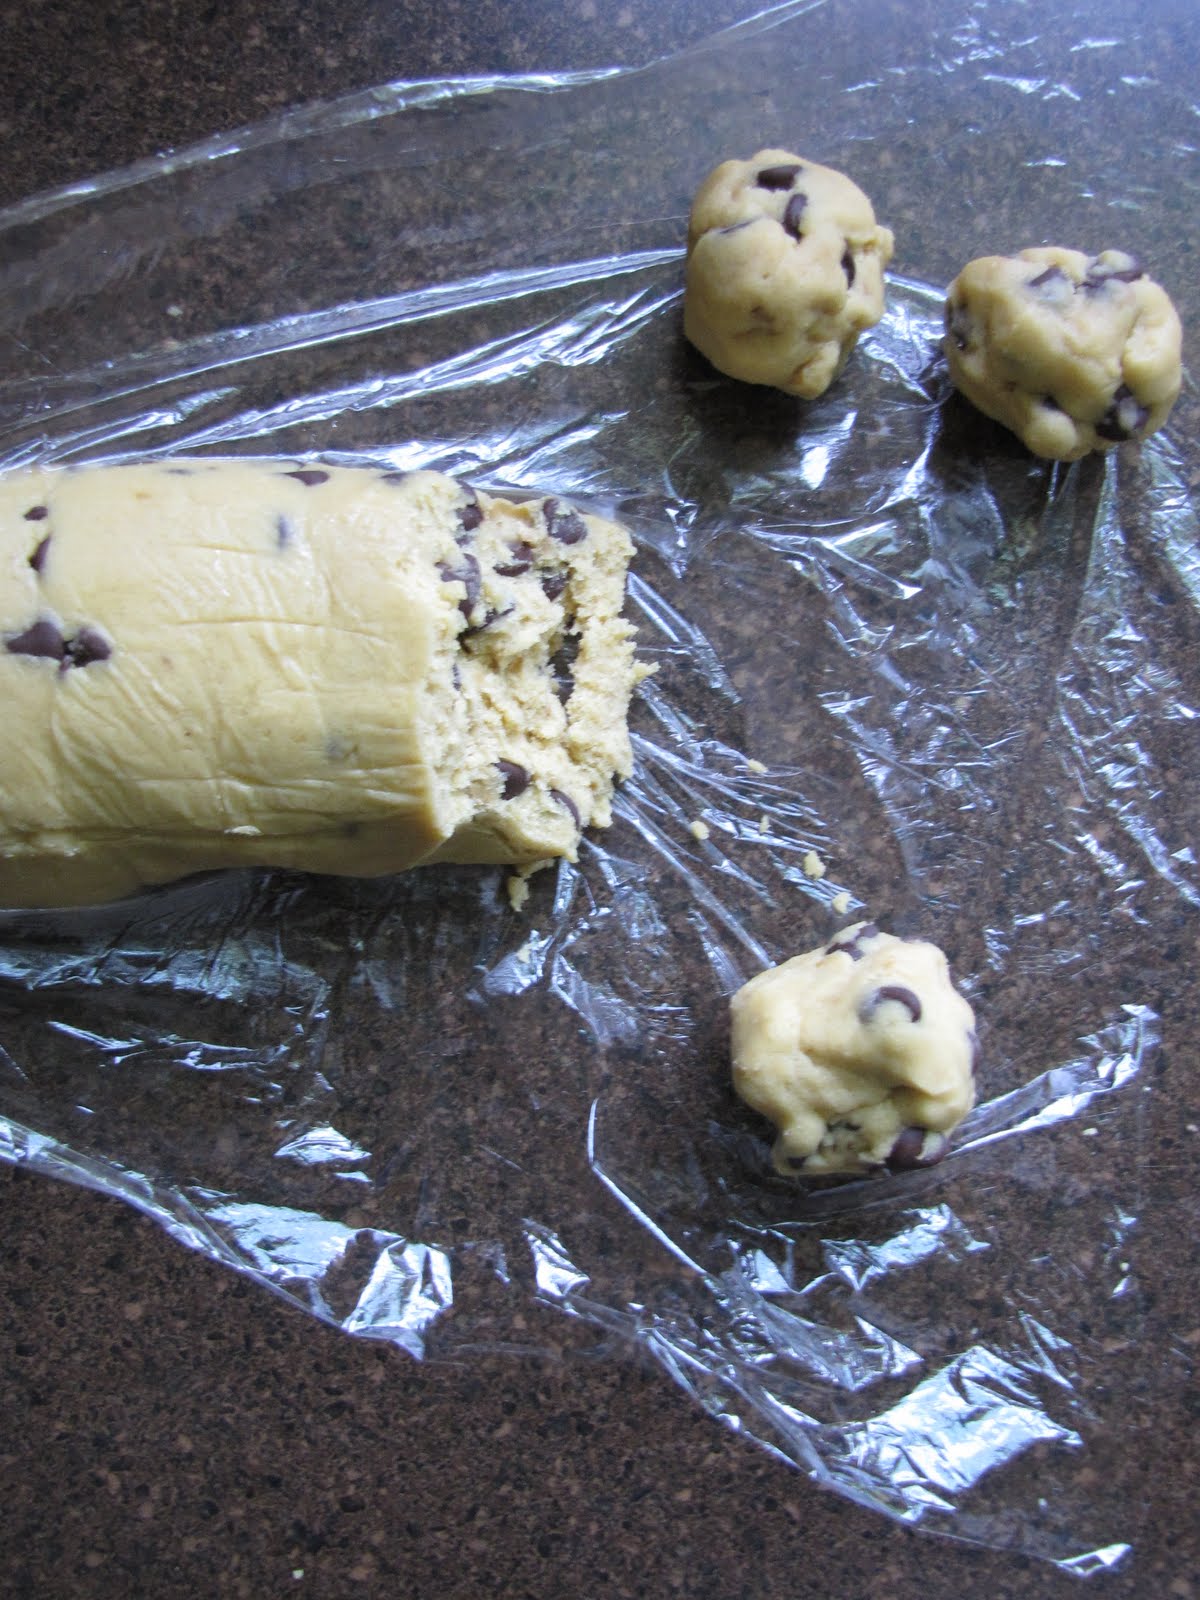
I put a VERY thin layer of frosting in between each color. Just enough to make the pieces stick.
It took me one container of frosting to put between the layers then I loosely covered it in plastic wrap and put it in the fridge for 30 minutes. I figured the cake would cut a little easier, be less crumbly, and show the colors better if it was a bit cool.
Then I used one container of frosting for the outside.
I probably could have used one more container but that just sounded CUH-RAZE-EE!
Then I topped it off with some "FunFetti", a quick and cheezy little banner...

really?!...
"Yay Mak!"?
I'm sure I could have come up with better than that!

Anyway... here it is!


or maybe more like "there it went"...
Delicious, fun to look at, and fun to eat!

09 June 2011

{Beth's Chocolate Chip Cookies}

I grew up using the Toll House Cookie recipe but even as a kid I found them to be a bit crumbly, flat and unpredictable. Then, about a year ago, I tried cookies made from this recipe at my sister-in-law's house. They were given to her by her good friend Beth.
I HAD to have this recipe!
Thankfully, Beth is a wonderful woman and not only shared the recipe with me but gave me the okay to share it with you!
You have no idea how lucky you are!
A few things you should know... 1. this recipe makes a double batch (about 4 dozen) and it's easy to half if you'd like... but why would you do that?! 2. this recipe included the unusual ingredient of instant vanilla pudding so if you want to make it on a whim, be sure you have it handy.  and 3. be sure to factor in an hour of chilling time when making these. I don't want you getting all excited only to find out you have to wait a while before baking them. I promise they're worth it!

Beth's Chocolate Chip Cookies
What You'll Need:
4 1/2c all purpose flour
2 t baking soda
2 c butter, softened {if you don't have any soft and ready, you can melt it and let it cool a little}
1 1/2 c packed brown sugar
1/2 c white sugar
2 (3.4 oz) packages instant vanilla pudding mix
4 eggs
2 t vanilla extract
2 c chocolate chips
2 c chopped walnuts (optional)

What To Do:

In a medium sized bowl, sift together flour and baking soda. Set aside.
In a large bowl, bream together butter, brown sugar, and white sugar.
Beat in the instant pudding mix until blended.

Stir in the eggs and vanilla. Blend in the flour mixture.

Finally, stir in the chocolate chips and nuts. Chill dough for at least an hour.
Preheat oven to 350.
Drop cookies by rounded spoonfuls onto ungreased cookie sheets and bake for 10-12 minutes. Edges should be golden brown.


29 May 2011

{Whole Wheat Honey Bread}

So I'm going to completely reinvent the wheel here but 100% of the credit goes to Heavenly Homemakers. She even has pictures of the process but I guess I got trigger happy and snapped a few pictures of my experience with it. Seriously though, this is her recipe. Not mine.
Just thought you should know.
Also... I LOVE this recipe. I have made it several times since the first time I tried it. It makes two loaves so I freeze one and we use the other for sandwiches and toast. I haven't had to buy store bread in months!
So here goes...

Honey Whole Wheat Bread
 
What You'll Need:
6 c (give or take) whole wheat flour, divided
{if you're new to whole wheat, you may want to try 4 cups whole wheat, 2 cup white, first to get used to the taste of pure whole wheat. The white helps it rise better too if you don't want a dense loaf. I've tried it with all measurements of flour and have been happy with the flavor every time.}
1 ¾ c warm water, divided
1/3 c honey
1 pkg. active dry yeast (2 1/4 t)
1 t sea salt
3 T melted butter

What To Do:
Mix 3 cups of whole wheat flour with 1 ½ cups of warm water in a large glass bowl.  Allow this to sit for about 30 minutes.  This will break down the gluten and help the bread to rise better.
In a small bowl mix together ¼ cup water, 2 1/4 teaspoons yeast and 1/3 cup honey.  Allow this to sit for about 10 minutes, or until the yeast is activated and mixture becomes bubbly.
In the meantime, melt 3 Tablespoons butter in a small sauce pan.  Remove from heat and allow to cool.  You don’t want the hot butter to kill the yeast.
Add 1 teaspoon salt, melted butter and yeast mixture to the flour and water mixture.  Gradually add the remaining three cups of flour and stir well.  As the dough becomes harder to stir, pour it out onto a clean counter and begin to knead the dough.  If you create a nice dough before adding all three cups of flour…you don’t need to continue to add it in.  Just add enough to make a nice, non-sticky dough.
Once you’ve kneaded your dough, place it into a bowl, cover the dough with a cloth, and let it rise for at least one hour or until it has risen to twice  it’s starting size.
While you’re waiting for your dough to rise, get two bread pans buttered...
Once it has risen, give the raised dough a nice punch. 
{hello, post preggo belly!}
Knead for three or four minutes until the air bubbles are all gone.
With a sharp knife, cut dough in half, shape into two loaves and place into buttered pans. 
Cover and allow 30 minutes to one hour to rise again.  They should double in size, but the rising should happen more quickly this time because the yeast knows what to do by now.
Bake the bread uncovered in a 350 degree oven for 45-50 minutes, or until the bread sounds hollow when you thump the top of it.
Allow the bread to cool in the pans for 10 minutes, then remove it to finish cooling on a wire rack.
MMM! So good! 

26 April 2011

Oma's Homemade Bread


I've said it before... I want to tell you about Oma someday.
Until I can sit down to write and actually do her justice, you'll just have to trust me on the recipes of hers that I share.
They're wonderful, like she was. 
Maybe it's just nostalgia but I will keep on making her goodies regardless. Enjoy!


Oma's Homemade Bread
{white and cinnamon raisin versions}
What You'll Need:
1 pkg yeast {2 1/4 tsp if using jarred yeast}
3/4 c luke warm water
1 T sugar
1 egg, beaten
3/4 c warm water
3 c all-purpose flour
For Cinnamon Raisin You'll Also Need:
1 tsp cinnamon
1 tsp nutmeg
1 tsp ginger
1 c raisins

What To Do:
Mix yeast, water, and sugar in a small bowl and let sit. Once bubbles form, put the mixture into a large bowl.
Add the egg, salt, and water.{If you're making the cinnamon-raisin version now's the time to add the spices.}
Slowly add the flour a cup at a time and stir in between each cup added.
If you're making the cinnamon raisin bread, add raisins into dough after the third cup.
Mix in more flour until the dough is no longer sticky. Turn over onto a floured surface.

Knead for 5 minutes, adding flour as needed until it no longer sticks.  Not sure what that means? Well...this is still too sticky.

{As a point of reference, I've had to add as much as two cups of flour during kneading, to get it to the right consistency}
Form into a ball and place the ball into a lightly oiled bowl. Loosely cover with a dish towel or plastic wrap. Leave in a warm, draft-free spot to rise for 45 minutes or until doubled in size. {If you are in a cold, dry spot, this make take closer to an hour to rise.}
I usually put my oven on as low as it will go for a few minutes, turn it off, then place the covered bowls in the oven with a small bowl of water to keep the humidity up. 
Once risen, punch the dough down, pour out onto lightly floured work surface, and knead for another 5 minutes. Place into a greased loaf pan and loosely cover with dish towel to rise for another 45 minutes.
Set the oven to 350 and bake for 45 minutes.
There you have it! Hot homemade bread! Hubs and I fight over the "butt" ends of the bread. I usually claim that since I baked it I get them but now that I make two loaves at a time I guess I have to share! Enjoy!

LinkWithin

Related Posts with Thumbnails